How to Hang Wallpaper
Follow these tips and instructions on how to hang wallpaper to help you end up with a neater
job with less waste and effort. Inside this document you will find information about:
- Preparing the Wall Before Papering
- Determining the Amount of Paper Required
- Marking, Measuring and Other Preparatory Steps
- Cutting and Hanging Paper
Note: you may also wish to read our paper hanging page for further advice.
TOOLS AND MATERIALS
Wallpaper or Prepasted Wallpaper
Wallpaper Paste
Sandpaper
Razor Knife
Seam Roller
Scissors
Smoothing Brush
Folding Rule
Marking Pencil
Ladders
Screwdriver
Paste Brush
Spackling Compound
Plastic Pail
Patching Plaster
Straightedge
Sponge
Paint Edger or Broad Knife
Browse our complete selection of wallpaper at AubuchonWallpaper.com!
Wallcoverings, Wallpaper Borders, Wallpaper Murals and more!
Use the Wallpaper Calculator to figure out how much to buy.
STEP #1
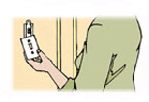
FIG. 1 - Turn off the electricity before you remove the switches and fixtures.
PREPARING THE WALL BEFORE PAPERING
- There are two important steps you should take before you begin to hang wallpaper. The first step is to read the manufacturer's instructions on the products that you will be using. The second is to properly prepare the walls to be papered. The more time you spend on preparing the walls, the more satisfactory the results will be.
- Always turn off the electricity and remove any wall plates, wall fixtures, outlet plates, etc., before you begin to hang the paper (Fig. 1)
- The walls must be in good condition. Any holes or cracks must be repaired.
- Any mildew should be removed with a mixture of two cups of household bleach per gallon of water. After the wall is dry, it should be primed with a good quality stain killer/primer.
- There are two quick tests you can perform to check the condition of painted walls. First, hold a damp sponge against the wall for about 15 seconds. Then wipe the area with a cloth vigorously. If very little paint comes off, the paint is okay. If a lot of paint comes off, the walls should be washed thoroughly with soap and water or a solution of six parts water to one part ammonia or sanded and washed to remove the paint.
- The second test involves cutting three small Xs into the wall surface. Place a piece of scotch tape over the Xs. Then yank the piece of tape off the wall. Again if very little paint comes off, the paint is okay. If a lot of paint comes off, you need to sand the walls
- Scape or sand any peeling paint to provide a smooth finish. Walls painted with gloss or semi-gloss paints should be sanded to dull the surface. All sanded surfaces should be primed before hanging wallpaper.
- Any stains like grease, crayons, ink, lipstick, etc., should be cleaned and primed with a stain killer/primer.
- For new drywall, be sure the areas along the joints and over nail heads are thoroughly cured and sanded smooth. New drywall should be primed with an opaque or a white primer.
- If you are hanging paper on a wall where old wallpaper has been removed, clean off any remaining wallpaper adhesive. The adhesive can be removed by sanding or by using an adhesive remover. Wash the wall and let it dry thoroughly. Prime the wall before hanging the wallpaper.
- If the wallpaper has not been removed and is in good condition you can hang the new paper over the old. Be sure the walls are clean and dry. The most important consideration here is the type of primer to use.
- With the development of wall liners, wallpaper can be placed over rough surfaces like paneling and masonry block. Use a primer that will provide good adhesion between the surface and the wallpaper. Wallpaper can be applied directly over paneling, but the grooves will need to be filled in and primed first.
STEP #2
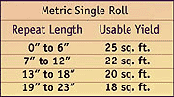
FIG. 2 - DETERMINE THE AMOUNT OF PAPER REQUIRED
- To determine the amount of paper you'll need, first measure the height of the wall from the top of the baseboard to the ceiling or moulding. Next measure the length of each wall. Add the lengths of the walls together. Find the total number of square feet by multiplying the wall height by the total number of square feet to be covered by wallpaper.
- American manufactured single rolls of wallpaper usually have about 36 square feet. Double rolls have about 72 sq. ft. Triple rolls have about 108 sq. ft. However, American rolls are being phased out and may be hard to find. Metric or Euro rolls have about 29 sq. ft. per roll. Double rolls have about 58 sq. ft.
- Use the metric single roll chart (Fig. 2). If your pattern does not repeat or if it repeats every 0" to 6", each roll yields approximately 25 sq. ft. If your pattern repeats every 7" to 12", each roll yields approximately 22 sq. ft. and so on. Divide the total number of square feet to be covered by the number that is appropriate for your pattern. This is the total number of single rolls of paper you will need for your wallpaper job.
- Wallpaper is usually packaged in single or double rolls. To find the number of double rolls you need, divide the number of single rolls by two. To find the number of triple rolls you need, divide by three.
- For example, suppose the ceiling is 8' high and the room is 10'x12' with two 3'x7' doors and two 3'x4' windows. This means the total wall length is 10' + 10'+ 12' + 12' or 44'. Find the total number of square feet, 44'x8' or 352 sq. ft. Find the number of sq. ft. per door, 3'x7' or 21 sq. ft. Remember there are two doors and two windows. Find the total number of sq. ft. not to be covered, 12' + 12' + 21' + 21' or 66 sq. ft. Then find the total number of sq. ft. to be covered, 352 - 66 or 286 sq. ft.
- If the pattern repeats every 8", we get 22 sq. ft. per roll. Find the number of single rolls, 286 divided by 22 or 13 single rolls. For double rolls, 13 divided by two or 6-1/2 means you should buy seven double rolls. For triple rolls, 13 divided by three or 4-1/3 means you should buy five triple rolls.
STEP #3
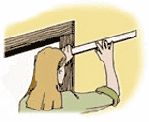
FIG. 3 - Mark the width of the wallpaper less 1/2" to the right of the door or window where you will begin.
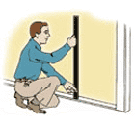
FIG. 4 - Use a level to lightly draw a pencil line from the ceiling to the floor.
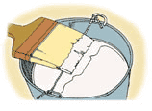
FIG. 5 - A string across the paste bucket helps keep the brush clean.
MARKING, MEASURING AND OTHER PREPATORY STEPS
- It is usually best to start hanging the first strip of wallpaper to the right of a door or window. This makes any break in the pattern of the paper less conspicuous.
- Measure the width of the wallpaper and subtract 1/2". This 1/2" reduction allows for the paper to overlap the adjoining wall.
- Mark the width of the wallpaper less 1/2" on the wall to the right of the door or window where you will begin (Fig. 3).
- Line up a level on this mark and draw a pencil line lightly from the ceiling to the floor. You may need to reposition your level several times. Be sure to line it up carefully each time (Fig. 4)
- You are now ready to mix the wallpaper paste. If you are using premixed paste or prepasted paper, this step is not necessary.
- If you are using paste, read the manufacturer's instructions carefully and follow them exactly.
- Always use cold water to mix paste. Mix it thoroughly to be sure it is free of lumps.
- Now tie a string across the top of your paste bucket (Fig. 5). This will keep the brush clean and enable you to brush excess paste out of the brush.
STEP #4
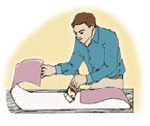
FIG. 6 - Brush paste on the cut piece and fold it back at each end.
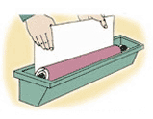
FIG. 7 - Place a piece of pipe or dowel rod in the middle of the roll to help run prepasted paper through the water.

FIG. 8 - A butt joint leaves no ridges.

FIG. 9 - Use a razor knife and straightedge to trim edges when necessary.
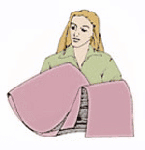
FIG. 10 - Carry the folded paper like a coat over your arm.
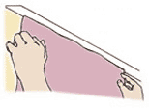
FIG. 11 - Overlap the paper at the top by about 2".
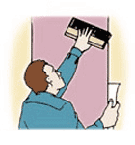
FIG. 12 - Smooth out the paper at the top and let the bottom fall into place by its own weight.
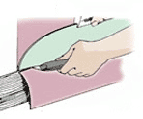
FIG. 13 - Trim off the surplus paper at the bottom and top.
FIG. 14 - Let the paper set about 15 to 20 minutes, then roll at the seams.
CUTTING AND HANGING PAPER
- Cut the first strip of paper 4" longer than the wall height. Be sure and allow for matching the pattern on the wallpaper.
- Unroll the next strip and match the pattern before cutting the second strip. Study the pattern carefully and match it before cutting.
- It is usually wise to cut no more than two or three strips of paper before applying them.
- Unroll the strip of wallpaper on the work surface with the pattern side down. Brush the paste on the covering about 2/3 the length of the strip (Fig. 6). Brush the paste out evenly and not too thick.
- You may want to add a few drops of food coloring to the paste to tint it slightly. This makes it easy to judge the thickness of the paste and detect any missed spots.
- Fold the pasted end of the paper back about 2/3 of the length of the piece.
- Put the pasted side to the pasted side, avoiding any creases.
- Slide the paper forward on the work surface and apply paste to the remaining 1/3 of the piece. Fold it back over in the same manner. Allow about five minutes before using the piece. If you have to stop or will not be using the strip right away, place it in a plastic bag to keep it moist.
- You can run prepasted paper through clear water (Fig. 7). Plastic and metal dip troughs for prepasted paper are available. Cut a piece of pipe or dowel rod one inch shorter than the trough. Lay it in the bottom of the trough over the paper. It will hold the paper under water as you pull it out.
- Most manufacturers recommend the butt joint (Fig 8). It leaves no ridges at all, but requires a little extra care to make. The edge of one strip is butted up against the edge of an adjoining strip. If you force the two edges together too tightly, it will form a ridge. If they are not placed together tightly enough, you will leave a gap between the two edges. Use the palms of your hands when positioning the paper. Try not to pull on the edges.
- Use extreme care when placing the first strip of paper on the wall, since all other strips of paper will be aligned to this first one.
- It may be necessary to trim the edge of the paper to ensure a proper fit. You can trim the paper with a razor knife and a straightedge (Fig. 9).
- Use extreme care when carrying long strips of pasted wallpaper. Drape the folded paper over your arm like a coat (Fig. 10). Never open the paper until it is in position to hang.
- When the paper is in position for hanging, unfold the top half of the pasted sheet. Overlap the top edge of the pasted paper (Fig. 11) at the top by about 2". You'll cut away this overlap in the trimming process.
- Hold the edge of the paper with one hand and pull the pasted fold apart. The pasted side of the paper should be held firmly against the wall.
- Line up the right edge of the paper with the pencil line you made previously (Fig. 4). Use a smoothing brush to smooth out the top and bottom. Allow the bottom of the paper to fall of its own weight (Fig. 12). Brush it out evenly. If you trap some air behind the paper, smooth it out with the brush. If this does not work, pull the paper away from the wall.
- Continue to apply each sheet of paper in this same manner. Use care to align the design in each succeeding sheet.
- Trim off the surplus paper at the bottom and top of each strip. Use a metal paint edger or broad knife and a razor knife to get a clean edge (Fig. 13). Change the blade on your knife every strip for better results.
- Use clean water to rinse all baseboards, casings, etc., with a damp sponge before the paste dries.
- Let the paper dry about 15 to 20 minutes, then roll all seams (Fig. 14). Use a regular wallpaper roller and roll thoroughly for a neat job. Do not apply too much pressure; you may form paste ridges under the paper or force the paste out through the seam.
- At the corners, measure from the last full strip of wallpaper to the corner and add 1/2". This 1/2" will allow the strip to go into the corner and onto the adjoining wall by 1/2" (Fig 16). If your walls are not running straight up and down, you may want to use 1" instead of 1/2". A small slit at the top and bottom of the piece in the corner will make it easier to go around the corner.
- For the next piece, measure out the width of the wallpaper from the corner and make a pencil mark. Use your level and make another perfectly straight line from the floor to ceiling as before in Fig. 4. This piece will overlap the 1/2" strip on the wall from the previous piece installed. For vinyl wallpaper, use a vinyl-to-vinyl adhesive on these corner seams.
- Be especially careful when trimming paper along the edges around fireplaces, windows, mantelpieces, etc. Sometimes the weight of the paper causes it to tear at its narrowest point
- For outside corners, measure the distance from the last full strip to the corner. Add 1" to this measurement. Measure the width of the paper and add 1/2". Measure out from the corner the width of the paper and add 1/2". Make a pencil mark on the wall. Using your level, again draw a light pencil line from the floor to the ceiling. Align your wallpaper with this line and match the pattern as closely as possible. This piece will overlap the last piece by 1/2".
- For doors and windows, hang the paper over the edge. Using your razor knife cut away the excess wallpaper. Making small cuts from the corners of the doors and windows toward the center will help you position the wallpaper around these obstacles. After the paper is smoothed, use your edger and razor knife to trim around the doors and windows.
- Since all the switchplates, outlet plates, etc. were removed before papering, you can apply the wallpaper right over these openings. The wallpaper can then be cut with the razor knife and straightedge (Fig. 17). Replace the fixture plates for a finished job.
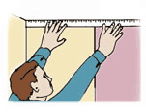
FIG. 15 - At the corners, measure the top and bottom. Cut the strip 1/2" wider than the greatest of these widths.

FIG. 16 - A small slit at the top and bottom will help you bring the paper around the corner.
|