Victorian Armchairs
We
buy and sell Victorian armchairs and Edwardian armchairs,
Victorian sofas and Edwardian sofas, Victorian settees and
Edwardian settees, Victorian couches and Edwardian couches,
Victorian ottomans and Edwardian ottomans, and Victorian stools
and Edwardian stools.
We
offer a full re-upholstery service, with renovation and restoration
of your own upholstery, all in our traditional workshop. John,
our upholsterer, has over 35 years experience.
We
have a large selection of unrestored armchairs and sofas in
stock.
See
below for our range of fine replica Victorian armchairs and
sofas.
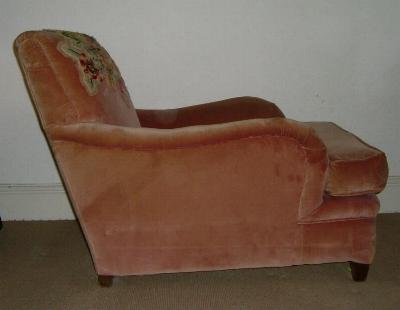
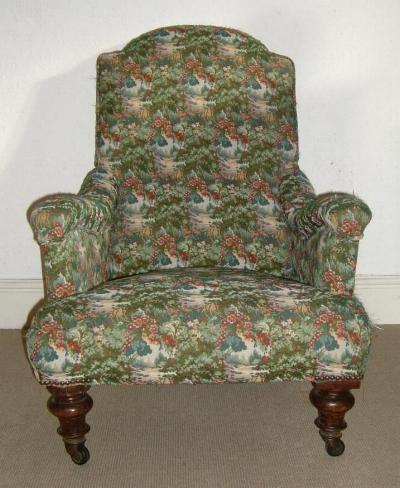
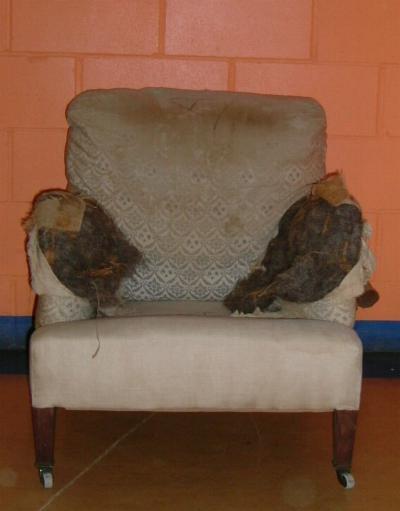
HOWARD
& SONS ARMCHAIR
Very
large and fine easy library armchair, by Howard and Sons
Height
0.870, Width 0.870, Depth 1.030
Price
SOLD (VA4)
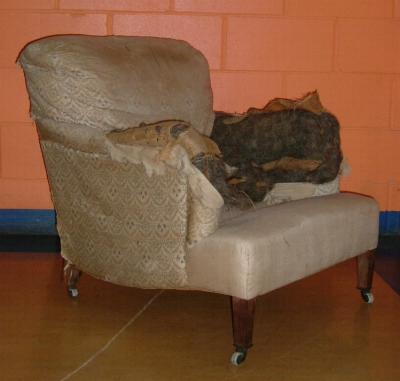
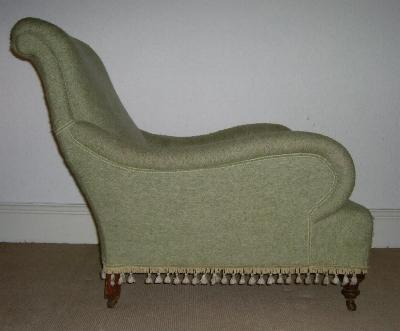
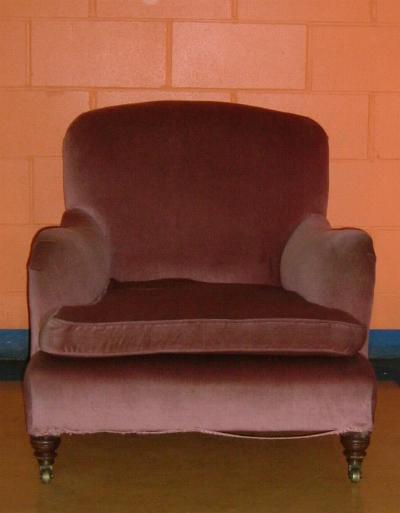
HOWARD
AND SONS ARMCHAIR
Fine
easy library armchair, by Howard & Sons
Height
0.830, Width 0.670, Depth 0.970
Price
SOLD (VA3)
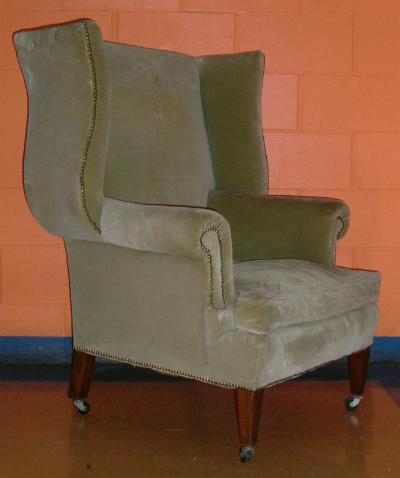
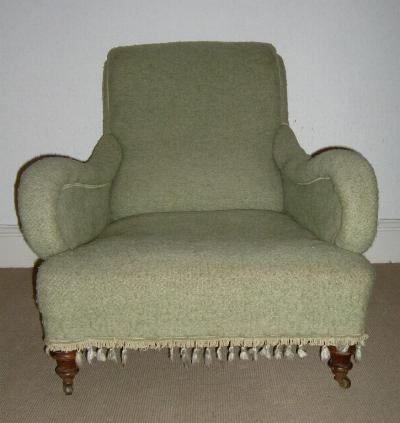
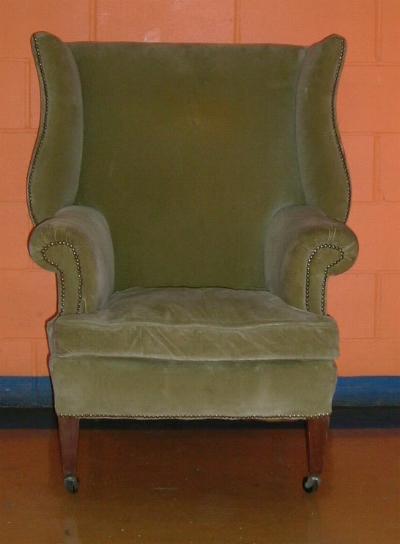
EDWARDIAN
WING ARMCHAIR
Fine
and large Edwardian wing library armchair, with Mahogany legs.
Height
1.180, Width 0.840, Depth 0.840
Price
£1150.00 (VA2)
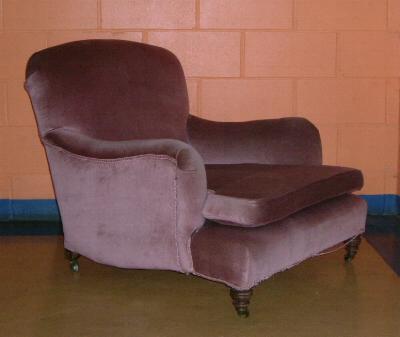
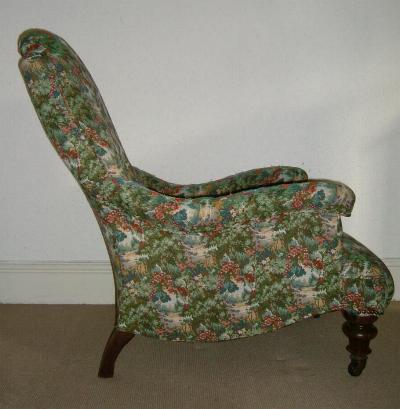
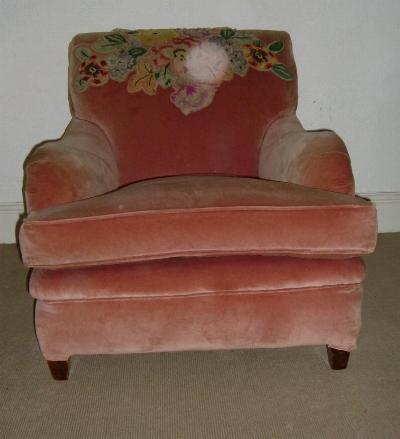
HOWARD
& SONS ARMCHAIR
Fine
and large Victorian easy chair, by Howard and Sons.
Height
0.810, width 0.820, Depth 1.020
Price
£1450.00 (VA1)
PRICING
The price for an original Victorian
armchair, fully renovated and re-upholstered starts at £850.00
(includes VAT and excludes fabric 7m and delivery).
The price for an orginal Victorian
sofa, fully renovated and re-upholstered starts at £1400.00
(includes VAR and excludes fabric 13m and delivery).
We
can replicate any arm-chair or sofa you have, and can upholster
in any of our extensive range
of fabrics, or we can use your own choice of fabric.
Please email
for prices.
RANGE
OF
REPLICA VICTORIAN ARMCHAIRS AND SOFAS
Each
sofa and armchair are made to order, and the sizes listed
can be adapted for clients specifications. We can adapt the
height width and depth of any of our armchairs and sofas,
and we are able to match any existing armchair or sofa you
may wish to copy.
We
can email larger images and further details upon request email.
A
GUIDE TO UPHOLSTERY
(HOW TO UPHOLSTER,
RECOVER & REPAIR TRADITIONAL AND MODERN CHAIRS, SOFAS,
OTTOMANS & STOOLS)
TOOLS
Magnetic tacking hammer
This is the most basic of all upholstery tools. There are
two main types.
1 A hammer with a plain 12 mm diameter head at one end, and
an 8 mm diameter magnetized cabriole head at the other. The
cabriole head is smaller and is used in places which are difficult
to locate with the larger head. The un-magnetized head is
also useful for nailing.
2 A hammer with a magnetized head at one end and a tack removing
claw at the other end. Care should be taken not to damage
the fabric when using this claw.
Tacks are still traditionally held in the mouth for convenience.
The beginner may be put off by the danger of swallowing one,
but this risk is minimized if only about six are held at one
time and they are stored beneath the tongue, to be brought
forward as required. Each tack can be withdrawn directly from
the mouth on to the magnetized end of the hammer provided
the tack is turned by the tongue so that the head faces outwards
from the mouth. Accuracy in placing comes with practice.
Staple gun
This is used by manufacturers for speeding up production.
It is not necessary for the home upholsterer. Guns are obtainable
either air powered from a compressor, or they can be plugged
in to the normal electricity mains.
Tape
A flexible 2 m metal tape is required for general upholstery
work. One which is graduated in both metric and imperial units
will be useful in helping the reader to convert from one system
to the other. The reader should accustom himself to think
directly in metric rather than convert continuously between
the scales. A straight wooden rule is more convenient for
cutting fabric on a flat table.
Pincers
A pair of pincers is required for extracting nails and staples
when stripping a frame.
Shears
A pair of shears is necessary to cut out fabric and for general
upholstery work. Heavy duty shears for cutting fabric are
usually 300 mm long but a pair 250 mm is suitable for both
operations. It is worth investing in a pair with a good brand
name.
Bench or trestles
A bench, or a pair of trestles, is required to support the
work at a height suitable for easy working, usually about
700 from the ground. The bench size should be about 750 mm
square, and the trestles about 750 mm by 200 mm. A padded
roll is often tacked round the perimeter of the trestles to
prevent damaging the work.
Mallet and ripping chisel
The ripping chisel is used for extracting tacks. Although
there arc many types available, an ordinary screwdriver with
a plastic or wooden flat-topped handle will serve the purpose
adequately. A mallet should always be used with the chisel
to prevent damaging the handle. Hold the blade on the edge
of the tack head and hit the chisel handle with the mallet.
A few blows may be required before the tack is lifted. The
tack should be ripped out in the direction of the grain to
avoid splitting the timber.
Staple extractor
Because of the ease with which staples can be put into a frame,
there are usually more of them to extract than if tacks had
been used. There arc many tools available for extracting staples.
The one illustrated is one of the more successful types. It
works by prizing the staple up with one of the end points.
A final twist pulls the staple free.
Webbing stretcher
This is used for stretching webbing tightly on a scat or back.
There are several types available. If the stretcher is needed
infrequently, a plain block of wood can be used. The webbing
is wound around the block which is then levered against the
frame to strain the webbing. Other specially made stretchers
have grooved edges which fit against the rail to prevent the
stretcher from slipping. One type uses a metal lever to hold
the webbing, while the bat type has a slot through which the
webbing is held by means of a peg. Another type has a series
of spikes at one end by which the webbing is held. The disadvantage
of the latter is that webbing is wasted due to the damage
caused by the spikes.
Needles
There are four basic types of needle required by the upholsterer.
1 Regulator. This is used to even stuffing. It should not
be used over a fabric because holes may result. Skewers are
safer for this purpose as they produce smaller holes, but
care needs to be taken. The flattened end of the regulator
can be used for moving stuffing beneath a fabric where a hand
can not reach. The needles come in different lengths, but
one 250 mm long should be adequate.
2 Skewers. These are not only used for regulating, but also
for temporarily holding material in position before slip stitching.
They are also used when making a spring edge for attaching
the scrim to the edge wire prior to sewing.
3 Straight stitching needle. This is used for stitching edges,
and for threading buttons through the upholstery. Both ends
of the needle are pointed.
A bayonet needle is similar, but is triangular in section
down one third of its length. The purpose of this needle is
to cut through stuffing which a stitching needle cannot penetrate.
It can be obtained in different lengths, but one stitching
needle about 300 mm long is satisfactory for most purposes.
4 Circular needle. This is semi-circular and is used when
the stitching needle is not practical, such as for sewing
hessian around a spring unit. This needle is about 100 mm
long, but smaller ones used for slip stitching are about 50
mm long.
A spring needle is bayonet pointed, and is used, as its name
implies, for sewing hour glass springs to webbing. This, too,
is used for sewing through stuffing which an ordinary circular
needle cannot penetrate.
Button making machine
This machine converts a two-piece metal mould and a disc of
fabric into a button. The top half of the mould forms the
shape of the button and the lower half contains the fixing.
This may be by a metal loop, a cloth tuft or a spike.
A peddle operated machine can be used more efficiently than
a hand machine. The object of both types is to bring the moulds
together, trapping the fabric between them. Automatic electric
machines are being used increasingly in factories.
Buttons can be obtained in different sizes, ranging from small
ones suitable for deep buttoning work, to the larger ones
of which very few arc needed for each job.
Loose seat machine
This is used in mass production to simplify the upholstering
of dining chair type loose seats. The machine consists essentially
of a jig to hold the frame, and a rain to compress the stuffing.
The cover is placed upside down in the machine, followed by
the stuffing, and then the base which, if necessary, has been
previously covered with webbing and hessian. The ram, which
usually works by compressed air, is brought down. This presses
the frame on to the stuffing. All that is now required is
to tack or staple the overhanging cover to the frame.
Cushion filling machine
This machine was common when spring interior cushions were
used. Now the use of dacron in cushions has created again
a demand for the machine. It can be worked manually by handles
or it can be air or electrically powered. The cushion is placed
in the machine and the lid is closed. The sides of the cushion
are compressed by the machine and the cover is slipped over
the mouth of the machine. A ram then forces the cushion forward
into the cover. The filling of the cushion is completed by
hand.
Electrical cutters
Special cutters can be obtained to cut anything from flexible
foams to layers of fabrics. There are two main types of electrical
cutter.
1 The straight knife which operates by the oscillation of
a vertical blade, and can cut greater thicknesses than the
round knife but is slightly slower.
2 The round knife which cuts by the rotation of a circular
cutting wheel, is usually fitted with an automatic knife sharpener.
MATERIALS
Tacks
There arc two types of tack: 1 improved and 2 fine. Improved
tacks are stouter, and are used where greater holding power
is necessary, such as for tacking webbing and hessian. Fine
tacks are used mainly on fabric.
Both types of tack can be obtained in a variety of sizes,
from 6 mm which are used on thin plywood facings, to 15 mm
which are used on webbing, and where many thicknesses of material
are to be penetrated. Rail thickness should be taken into
account when choosing tack sizes, because too large a tack
may split a narrow rail.
Gimp pins
These are obtainable in different colours to match a fabric.
They arc 12 mm long and are cut with a small head to be inconspicuous
in use. They are used for fixing cover along the edge of a
show wood frame, such as may be found at the top of a chair
leg. They arc also used for fixing gimp in place.
Nails
1 No-sag nails These are used for fixing serpentine spring
clips to the frame. They are 21 mm long and are serrated down
their length to prevent them loosening in use.
2 Clout nails These are 25 mm long and are much thicker than
no-sag nails. They are blue, have serrations down their length
and are used mainly for fixing spring units to the frame.
Twines
These are made mainly from flax and hemp, but synthetic twines
are gaining popularity for certain purposes where a greater
strength is needed such as for fixing buttons.
1 Stitching twine was originally used for stitching roll
edges but it can be used wherever a thin but strong twine
is required such as for fixing buttons.
2 Spring twine is thicker and stronger than stitching twine.
Its original use was for sewing loose springs to webbing but
is now used more widely.
3 Laid cord is not frequently used. It is a thick cord for
lashing springs together to form an integral unit. It is made
by laying the fibres side by side to prevent the cord from
stretching.
4 Piping cord is used in making upholstery with self-piped
seams. The cord is attached to strips of the fabric, which
is then sewn to the main fabric panel. See CHAPTER 7 page
48. Piping cord is made from synthetic fibres, cotton and
compressed paper, in different diameters and with different
stiffness ratios for different types of fabric.
Webbing
This is used as a platform to support hour glass springs
and other fillings. It is not being used as widely as in the
past owing to new springing systems which are available.
There are two main types of webbing.
1 Brown webbing which is made from jute in a plain weave
and can be obtained in rolls of different widths.
2 Black and white webbing which is more expensive but is
of better quality. It is made from flax, woven with a twill
weave.
Hessian
This is a loosely woven jute cloth used for covering springs,
loose stuffings and webbing. It is also used for making flies
(which are extension pieces, sewn to a fabric, and are hidden
inside the upholstery, therefore saving material). Hessians
are available in different weights, the heavier hessians being
known as tarpaulins.
When fitting hessian, keep warp and weft lines straight, as
with a fabric. Hessian can be cut in a straight line by withdrawing
a thread and cutting along this line. All hessian edges should
be turned over for tacking, unless neatness is of more importance
than strength, in which case they should be folded in.
Scrim
This is also made from jute. It is similar to hessian except
that it has a more open weave and the threads are flat in
cross section as opposed to the hessian's round threads. It
is generally lighter than hessian. It is used for covering
the first stuffing through which a stitched edge is sewn.
Keeping the lines straight on the scrim aids the stitching
of a straight edge because one thread can be followed as a
guide for the line of stitching.
Calico
This is a light, bleached cotton fabric. Strips of calico
are used for attaching foam to a frame and as a base cover
for upholstery. It is also used for covering upholstery prior
to fitting the fabric, as described under Sewing a spring
edge.
Rubber webbing
This is a form of springing, as opposed to the webbing previously
mentioned. It consists of a core of rubber sandwiched between
two layers of rayon cord which have been cut on the bias (diagonally).
When the webbing is stretched, the cords control the amount
of elongation in the webbing and, as the cords draw closer
together, the webbing retains its strength. By varying the
internal arrangements of cords, rubber and the angle of cut,
it is possible to alter the characteristics of webbing.
All-rubber webbings are also available but, as they have
no woven reinforcement, they do not retain their strength
when stretched. They give a greater deflection of the cushion
than reinforced webbing.
Different webbings have different characteristics. By selecting
the appropriate type, the required degree of resilience can
be obtained. The depth of spring can be determined by:
(a) controlling the initial tension on the webbing
(b) using a specified width of webbing
(c) adapting the spacing of the webbing to conform with the
loading on specific points.
The type and thickness of the cushion should conform with
the characteristics of the base.
Fitting rubber webbing
There is wide scope for individual ingenuity when applying
webbing to produce seats and backs which can be adapted anthropometrically
to the user. Webbing which is applied from front to back on
a seat has the advantage that the width, and therefore the
weight of the sitter, is distributed across all the straps
by the cushion. The cushion is also free to rise and fall
between the sides of the frame without being tilted inwards
around the sitter.
Disadvantages of this method are that a soft front edge can
not be obtained, and the support given by the webbing is no
greater at the points of maximum load than in less loaded
areas.
Webbing stretched from side to side can be given a soft front
edge; and as the zone of heaviest load occupies the rear half
of the seat, increased support can be incorporated in this
area, by giving the straps greater initial tension or by using
wider or more closely spaced straps. Where additional support
is needed the straps can be run in both directions.
Fitting straps on the back can be treated in a similar manner.
Loads encountered here are less than on a seat. When the webbing
is placed from side to side it is possible to provide firmness
for the lumbar region and the head rest while retaining greater
softness in other parts of the back. Concave backs can be
made by using cross webs in low tension, pulled into shape
by verticals under higher tension.
Webbing can be obtained in a continuous roll and can be applied
by direct tacking or stapling. It should not be turned over
at the ends. There are many types of clips available for attaching
webbing to both wooden and metal frames. These clips are responsible,
to a greater extent, for the successful introduction of the
webbing because they simplify its application. The neatest
and most popular clip is the one which fits into a grooved
rail and ensures equal tension on all straps.
Rubber platforms
These area variation to rubber webbing. They are made from
a synthetic rubber, and provide the newest form of springing
system. They can be obtained in different sizes, and are attached
to the frame at four points. The platform is fitted under
a tension of between 8 to 15% in order to function correctly.
This percentage has to be worked out when calculating the
size of platform required.
Spring systems
1 Loose hour-glass springs. This is a traditional type of
spring which was used in all sprung upholstery before 1920.
Its use is associated with traditional hand stitched work
which is very expensive in labour. The springs are double
cone in form and are made from
copper-plated wire. The springs arc coiled and knotted at
both ends by machine.
2 Patent spring units. These arc assembled units, available
for seats, backs and arms. They have a flexible wire mesh
surface into which conical springs are threaded. The mesh
may have a framing of rigid wire. The single cone springs
arc riveted to steel laths at the base of the spring. Some
units arc fitted with tension springs which arc fixed at intervals
between the cone springs and arc attached to steel strips
between the laths. Tension springs provide added comfort to
the unit.
Double spring units arc not very popular, but they give added
luxury to a seat. The base layer of springs is similar to
the single spring unit, but the upper layer contains hour
glass springs which may or may not be covered in calico or
hessian pockets to muffle any spring noise.
3 Tension springs. These are suitable for seats and backs
where the design does not allow for a full spring unit. Although
rubber webbing is a strong competitor to tension springs,
they are still being widely used. The plain metal spring is
used where they are to be covered by upholstery, but when
they arc exposed or in contact with a cushion, they can be
obtained with a PVC or woven fabric covering. They arc supplied
in 1-22 to 2-03 mm SWG (14 to 18 gauge) wire, and in a variety
of lengths. They are fitted under slight tension, usually
between 35 mm to 50 mm and 45 mm length. The tension on these
springs has an opposite mechanical action to the compression
which coil springs undergo. Tension springs are fitted by
direct nailing, hooking around nails, fixing to metal plates
and by nailing them into a groove.
4 Serpentine or 'o-sag' springs Serpentine springs can be
supplied cut to length, in a continuous roll or made up into
units. A thicker gauge spring should be used on the seat than
on a back. They do not exist as a spring until they arc uncoiled
and fixed to the frame. They are constantly trying to return
to their original circular form which gives them a permanent
arc.
Five springs fixed from front to back or bottom to top, are
normally used in chair seats and backs. They arc fixed to
the frame by means of special clips of which there is a variety
for different applications. Connecting links can be used to
join the springs together so that they perform as a single
unit. If connecting links are not available, the springs should
be tied together with a thick twine across the centre of the
springs.
5 Pullmalex suspension unit This is another recent springing
system which is suitable for seats and backs. It consists
of a Hexolator, a wire platform cross gridded with twisted
kraft paper centre ropes, which is fastened to the frame by
tension springs. They are quick and easy to fix by means of
anchors which are attached to the tension springs. Only thin
upholstering is required over this spring.
Flexible foams
The manufacture of latex foam
Natural latex, containing the rubber molecule polyisoprene,
is obtained from the rubber tree, and once was the only source
of rubber. Today, synthetic rubber, styrene butadiene latex,
is usually blended with natural latex to extract the best
properties of both types of foam.
Natural latex is obtained as a juice from the hevea brasiliensis,
the rubber tree which is cultivated in Malaysia, Indonesia,
Ceylon, West Africa and Brazil. After extracting the latex
by tapping the tree, ammonia is added to the latex to prevent
it from drying. The latex is concentrated by extracting water,
which accounts for about 65% of the liquid tapped from the
tree. The latex is shipped to the site where it is to be manufactured.
Ammonia is extracted by blowing air through the latex. There
arc two main processes of manufacture.
The first process mechanically foams the latex before its
poured into the moulds. Various chemicals are dispersed in
water and are then mixed with the latex. The most important
of these chemicals is sulphur, a yellow solid, which, later
in the process with the action of heat, brings about the change
known as vulcanization or curing. The sulphur causes the latex
molecules to crosslink, which prevents the latex from becoming
soft and loosing its shape during hot weather, and going hard
in cold weather. Other chemicals mixed in are soap which helps
with the foaming, and anti-oxidants which protect against
oxygen in the air. The mixture is then allowed to mature under
controlled time_and temperature.
After maturing, foaming takes place. Foaming is continuous,
by passing the mixture with air through a mixing head. The
action through the rotor causes the air to be uniformly mixed
with the foam. Various degrees of firmness can be produced
at this stage. The foam passes through a hose to where an
operator fills the moulds. Gelling or solidification of the
foam in the mould is brought about by two additives, zinc
oxide and sodium silicofluoride, which are added after frothing
the foam. It is during gelling that the air bubbles are interconnected.
The moulds pass through a steam chamber for 25 minutes, which
causes the sulphur to vulcanize the rubber. The foam cushion
is extracted from the mould, washed, dried and inspected.
An alternative method of foaming is by chemical means. The
latex compound is foamed by oxygen which is extracted from
the chemical hydrogen peroxide. A calculated quantity of hydrogen
peroxide and a catalyst (a substance which helps the chemical
reaction to occur without undergoing change itself) are stirred
into the latex compound, and this is immediately poured into
a mould. Decomposition of the hydrogen peroxide with subsequent
foaming of the latex compound takes place after the mould
is closed. Freezing, gelling by carbon dioxide gas, and vulcanization
are carried out as before.
Cavity design in latexfoam
Latex foam can be obtained either plain or with cavities.
Solid foam contains much rubber which serves no useful purpose.
Large communicating cavities are included to increase the
comfort of a cushion. This is because when sitting on a solid
sheet of latex, air is driven out and it eventually feels
hard. In cavity cushion, the weight is taken by the walls
of the cavities, causing them to flex slightly. Cavities are
made by building plugs into the lid of the mould. The design
and layout of cavities control the hardness of the foam, and
it is possible to provide different hardnesses in different
parts of a foam block.
Types of latex foam
There are five main types of moulding, each group of which
covers a range of standard products. Special mouldings can
be produced when the quantity ordered justifies the making
of a mould. When this is uneconomic handbuilding is used.
1 Non-reversible units These have a smooth surface with the
underside showing the cavities. There is a wide range of mouldings
which are used for fixed upholstery work.
2 Reversible units Made from two non-reversible units which
are bonded together with the cavities on the inside. They
are used for loose cushions. A wide range of standard mouldings
are available.
3 Cavity sheet Made in sheets up to 1800 mm by 1400 mm and
from 25 mm to 100 mm in thickness. They are available with
various degrees of firmness and are used mainly for handbuilding.
4 Plain sheet in sheet sizes up to 1800 mm by 1400 mm and
from 12 mm to 30 mm in thickness. They are available in various
degrees of firmness, and are used for covering arm pads, dining
chairs, bar seating and handbuilding.
Polyether foams
These are open cell flexible polyurethane ether foams as opposed
to the polyurethane ester foams which are not used in similar
flexible form in upholstery. Polyether is cheaper in price
than latex foam, and is available in various thicknesses and
densities, including densities lower than can be obtained
in latex. It is therefore possible to choose a suitable foam
for almost any requirement. The density is controlled by the
chemicals which are mixed when making the foam. Fire retardent
grades of foam are also available.
The main defect of polyether is that it offers a high initial
resistance to deformation, although once a certain load has
been reached this property disappears. This is known as hysteresis,
and can be described as giving a sudden sinking feeling. These
foams have been modified to such a degree that this property
is no longer so noticeable. The chemicals carbon dioxide and
urethane polymer are reacted together no further vulcanizing
is then needed as with latex, because after foaming, the polyether
sets into its final form. There are two ways by which polyether
can be made:
1 Prepolymer The ingredients react together before foaming
begins. This allows greater control to be kept over the process,
which ensures that the polyether will contain the required
properties.
2 One-shot In this case, mixing and foaming take place simultaneously.
Bonded chip foam
This is made from reprocessed waste polyether foam which is
cut into small granules. The polyether chips are mixed in
a preditermined ratio with a precatalysed polyurethane resin
in an extruding machine. The resin crosslinks under pressure
and sometimes heat, and the chipfoam emerges the same shape
as the die at the head of the extruder.
Chipfoam is available from 2 mm in thickness. The thinner
layers are rotary cut from a cylinder of chipfoam, in which
the cylinder is peeled to give a continuous length of chipfoam.
It is available in many grades, giving densities up to ten
times greater than is possible in polyether foam.
Chipfoam is used in better quality upholstery as a base layer,
over which a softer padding material is fitted. It can be
used to advantage, together with a moulded rubber edge profile,
over a seat spring.
Rubber profiles
These are made from latex and chipfoam and are available with
different shaped cross sections for every possible roll and
edge application. They can be glued to foam or tacked directly
to a frame.
Fibre
Loose fibre is not used much now in upholstery owing to the
time and skill involved in its correct use. Different types
are available, each being characterised by colour. Coir fibre,
also known as ginger fibre, is obtained from the coconut husk,
and is the most resilient type. It is shipped from Ceylon
in bales which are broken open, and the fibre is teased to
separate the fibres. A dust extraction system removes any
remaining husk and the shorter fibres which add to the bulk
but not to the quality of the fibre.
Algerian grass, often called black and green fibre, is obtained
from the Algerian palm tree and is the next best quality of
fibre.
Fibre pads are more convenient to use than loose fibre. These
are made by needling a predetermined quantity on to a hessian
backing.
Curled hair
This is used as little as fibre for the reasons stated above.
It is more resilient than fibre and is much softer to the
touch. Hair is usually obtained as a mixture of horse, cattle
and hog hair, the proportions depending on price. Horse hair
is obtained from the mane and tail and is of better quality
than cattle hair which, in turn, is better than hog hair.
The hair is first washed, and a proportion is dyed black.
After mixing, the hair is spun into rope, and a curl is set
in by steaming or boiling the rope. Heating also sterilizes
the hair. After drying, the ropes are stored to allow them
to mature. When required, the rope is untwisted and teased,
or it is needled on to hessian to make hair pads.
Rubberized hair
This is obtained in sheets of varying densities. It is made
by bonding curled hair with rubber latex which is then compressed
to the required thickness and density.
Felt
Best quality felt is made from cotton linters which are obtained
from the waste of the cotton plant after the cotton fibres
have been extracted. These linters are pressed into an even
layer. Felts can also be made out of rag flock made from processed
rags, but this product is not as resilient as cotton felt.
To conform to British Standards, the rags need to contain
So to 60% wool. Felt is used over fibre and hair to prevent
fibres from working through the covering fabric.
Polyester fibrefill
This is a recently developed cushion filling material, made
in terylene and dacron, which has contributed enormously to
the comfort of seating. It is available as a bonded batting,
in which the sheets are lightly bonded with acrylic resin
on each side, making the material more compact and easier
to handle. Unbonded batting is also available, in which the
fibrefill is carded and folded into layers, which are then
sandwiched between a loosely woven cheese-cloth.
The fibre has good bulking power, and cushions filled with
the material are characterised by a full appearance. The fibre
is very soft and recovers well from compression. This is due
to a new three dimensional spiral crimp, or a saw-tooth type
crimp, which is given to each fibre.
Fibrefill can be used by itself in a cushion or in combination
with any type offoam which will blend with the fibre. When
a core of foam is being used, cut the foam about the same
size as the cushion cover, and wrap the required number of
layers around the cushion. If unbonded batting is being used,
stitch the cheese-cloth together along three sides for a neater
appearance of the cushion. Keep the unsewn edge to the front
of the cushion. Bonded batting can be lightly glued to the
foam. If a 100% fibrefill cushion is required, use the unbonded
batting and fold it to about 25%, longer and wider than the
cushion size. Use about 370 gm/m2 (4.4 oz per sq ft) in a
seat cushion, and 1220 gm/m2 (4 oz per sq ft) in a back cushion.
Kapok
This is a vegetable filling material obtained from the seed
pods of the kapok tree. It is used in cushions as a cheap
substitute for feathers and down. The fibre comes from Java
and the Dutch East Indies where it is washed, graded, and
compressed into bales for shipping. When it arrives in this
country, it is reprocessed by drawing by suction through a
hopper, in which the kapok is beaten by arms revolving on
an axis. This separates seeds and sand, and expands the kapok
into its fluffy and light form. Kapok is extremely light because
of the porous nature of the fibre, but in spite of this, water
does not penetrate it very easily. Because of this property
it is used as a filling for upholstery in ships, and lifesaving
equipment.
Feathers and down
These are still used extensively in the more expensive traditional
upholstery. Down obtained from the cider duck is more expensive
than feathers but is rarely used by itself. Feathers are normally
mixed m to give extra weight and to lower the cost. Down contains
no large quills and has a much greater filling capacity than
feathers.
Feathers arc obtained mainly from poultry, much of which is
imported from China. Cheaper grades of feathers arc chopped
to prevent there being felt through the fabric.
Feathers and down arc weighed, and then filled by vacuum through
a hose into waxed calico cases which prevent the quills from
penetrating the fabric. The cases are often divided into three
or four separate pockets to spread the filling equally throughout
the cushion. The case should be slightly larger than the cushion
cover into which it is to fit.
Castors
These are a necessary fitting for upholstery, and much scientific
experiment has gone into perfecting different types. The ball
type is very popular because its patented design ensures almost
frictionless and silent mobility.
Castors can be provided with different wheels for various
floor surfaces, and there are different methods of fixing
them to metal and wood frames. There are two main methods.
The first is by a screw plate, and the second is with a socket
fixing, where the socket fits into a drilled hole in the frame,
and the peg of the castor can be pushed into the socket.
Glides can be fitted to light furniture which does not need
wheeling about. They can be fitted by hammering on directly,
or by means of a socket.
UPHOLSTERY FABRICS
Traditionally, the upholstery fabric market has been predominantly
based on a number of fabric types, including moquettes, velvets,
tapestries and brocades. Recently there has been a strong
move towards the woollen Scandinavian boucle type of fabric.
Acrylic velvets are also being exploited, due to their brightness
and the clarity of colouration that they can be given, also
to their warmth, softness to touch, durability and easy cleaning
properties. The trend has particularly moved away from moquettes.
The choice of fabric is a major factor influencing the success
or failure of any job. A well chosen cover can transform a
mediocre design into something attractive, but a badly chosen
cover can make even a well upholstered chair appear drab.
Certain covers which may suit certain styles of upholstery
may be unsuitable if used on other designs. A cover should
be chosen which fits in with surrounding materials, considering
texture, pattern and colour. The amount of wear that is likely
to take place must also be taken into account when buying
the fabric.
Woven fabrics
1Bedford cord A fabric with ribs running in the direction
of the warp. It is made in a plain or twill weave, and can
only be obtained in single colours.
2 Brocade A finely woven jacquard fabric with a mufti-colour
pattern. Originally it was a heavy silk fabric with elaborate
pattern, made with silver or gold thread. It is made by floating
extra coloured threads on the back of a plainly woven ground
cloth, which are brought to the surface when required. Brocades
are made from cotton, wool, silk and manmade fibres, and have
a firm and smooth hard wearing surface.
3 Brocatelle This is similar to brocade, but the heavily
figured pattern is raised above the weft backing.
4 Corduroy A cut pile fabric with ribs running in the warp
direction. The weft yarns float on the surface at intervals
which are then cut, brushed, and singed to form the pile.
It is a hard wearing fabric, made from cotton and man-made
fibres, and is in the medium to high price range.
S Chintz A closely woven printed cotton fabric in a plain
weave and with a glazed surface.
6 Crash A heavy, rough textured, plain woven fabric made
from jute, flax, hemp and cotton.
7 Cretonne Similar to chintz but without the glazing.
8 Damask Similar to brocade, but it is flatter and is reversible.
It was originally made in Damascus from where it takes its
name.
9 Denim A hard wearing coarse cotton twill fabric of low
cost.
10 Genoa velvet A heavy velvet with a multi-coloured figured
pile on a smooth ground. It is a very expensive fabric.
11 Moquette A fabric having a pile which is cut, uncut or
in a combination of both.
Cut moquettes are made by weaving two fabrics face to face,
the pile being formed between, by interlacing both fabrics
simultaneously with warp threads. The pile is then cut by
a knife which travels between the fabrics. Another method
of weaving is by lifting the warp threads over wires which
are inserted in place of the weft. The pile is cut by the
wires as it is withdrawn. Uncut moquettes are made with two
warps, one of which forms the pile. Wires are inserted in
place of the weft, but unlike those used above, they have
no cutting edge. After weaving, the wires are withdrawn, leaving
a pile in the form of loops. Moquettes having a combination
of cut and uncut pile use cutting blade wires and plain wires.
They are extremely hard wearing, can be obtained in many designs
in both man-made and natural fibres but are generally very
expensive.
12 Plush A fabric having a longer but less dense pile than
velvet. It is in the medium to high price range.
13 Repp A plain woven fabric with ribs in the direction of
the weft. It is a very hard wearing fabric, in the medium
price range.
14 Sateen A fabric in which the weft float over the surface
of the warp forming a smooth surface. It can be made without
twill lines. The weave is also known as welt satin, and is
in the medium price range.
15 Satin A fabric in which the warp float over the surface
of the weft, forming a smooth surface. This weave is also
known as warp sateen.
16 Tapestry A jacquard figured fabric made from part or all
wool, with coarse yarns which can be made
in a variety of weaves. It can be obtained in many colours
and is very expensive.
17 Terry velvet An uncut loop pile velvet which is woven
over wires similar to the uncut moquette. It is very highly
priced.
18 Ti-need A simple twill weave fabric with a smooth, hard-wearing
surface. It is usually made from all wool, but other fibres
are also used. Due to its simple weave, the fabric is reasonably
priced.
19 Velour A warp pile fabric with a very short pile.
20 Velvet Produced with a double warp, one of which forms
the pile. The ground warp is woven with weft yarns through
which the pile is woven. A wire with a cutting blade is inserted
between the pile warp to form loops, which are cut as the
wire is extracted. Velvets are also made in a similar way
to cut moquettes, by weaving two fabrics face to face with
the pile between, which is sliced through the middle to separate
them. It is very highly priced.
21 Velveteen A weft pile fabric. It is woven with floating
weft yarns which are cut after applying a paste to the back
of the fabric to fix the yarns, so they do not move during
cutting.
Knitted fabrics
These arc used in woven fabric applications. They arc also
for covering plastics chair shells because their stretch properties
are well suited to fitting around the double curvature shapes
associated with these types of chair.
They are liable to damage by loop pulling and laddering, which
do not occur so frequently with woven covers. Damage is usually
caused during sewing and fitting of the cover. Laddering can
be caused by piercing the fabric with sewing needle, tacks
and staples. The fabric can also be damaged if too rigid a
seam is used for sewing, in which case the fabric might be
torn by the thread when it is being stretched during upholstering
or use. Foam or rubber backing a fabric lessens the chance
of laddering.
1 Warp knitted fabrics These can be woven to give an appearance
of either ordinary woven cloth or weft knits which are described
below. They can be produced faster than woven fabrics, and
are used in competition with them. They can be made with raised
or unraised loops and can be made ladder resistant (a disadvantage
associated with weft knits). They are woven mainly from continuous
filament yarns, and different types of surface texture can
be produced with either an open or closed structure. Knitting
styles vary with different machines, the difference between
machines being based on the number of needles and the thickness
of yarn which is used. Warp knits are so called because threads
run along the length of the fabric.
2 Weft knitted fabrics These fabrics have more stretch than
warp knitted fabrics. The fabric is made up of interlocking
loops of yarn. The loops are formed across the fabric with
a single thread. There are three basic types of weft knitted
fabrics used in upholstery: single jersey, double jersey and
interlock, all of which can be knitted with variations. The
former is a plain knitted fabric, and is very prone to laddering.
Double jersey has a rib structure, and is so called because
the stitches which lie in two planes tend to come together
to form a double fabric. Interlock is also a double rib fabric,
but it has interlocking cross yarns which prevent the fabric
from damaging easily.
Coated fabrics
Rexine made from nitrocellulose was the first plastic coated
fabric to be used, but has now been superseded by other plastics.
Polyvinyl chloride PVC fabrics have good abrasion resistance
and are easily cleaned. This makes them suitable for both
contract and domestic upholstery.
The properties of a coated fabric depend on the backing fabric,
the type, content and thickness of the coating material, the
adhesion between and the method of application of the coating
to the fabric, and the decoration of the surface. Many types
of backing fabric are used for strengthening the coating surface.
The cheapest fabrics have no backing, and tear more easily
than backed fabrics. Vynide has a woven backing fabric having
good abrasion and flexing properties. Other PVC materials
have knitted fabric backings to give the fabrics greater stretch
properties, making upholstering easier. Expanded and unexpanded
PVC are used in making coatings. Ambla and Cirrus are expanded
fabrics which are softer and warmer than plain PVC fabrics.
They are made by incorporating a blowing agent which expands
the mixture to give a thin layer of foam with an integral
skin of solid PVC. A plasticiser is added to PVC to give the
fabric certain properties. The type and quantity used affects
abrasion resistance and general flexibility.
PVC fabrics can be obtained in many colours. The amount and
type of pigment used affects the light stability of the fabric.
There are two methods of making the coated fabric, both of
which use PVC as a plastisol (paste). The doctor knife method
is the process usually used, in which the paste is spread
on the fabric by means of a roller and a doctor knife, which
control the thickness deposited as the fabric moves between
them on a conveyor. The fabric then passes through a heated
oven at i6o to i7o°C to gell the coating. An embossing
roller imprints the pattern on the surface, and the fabric
is rolled.
A second method, dip coating, involves passing the base fabric
through an impregnating bath containing the paste. Excess
paste is removed by rollers. Heating and embossing is carried
out as above.
Polyurethane
These fabrics are more like leather than other synthetics.
They are usually applied in a thinner coating than PVC. Like
PVC, they are air permeable, have good stain and abrasion
resistance, and are easy to clean and upholster with. They
can be finished with a matt or gloss `wet look'. Glossy fabrics
usually contain a two-component finish, and the fabrics are
tested to ensure that they will not delaminate through bad
adhesion of the two dissimilar coatings. Certain of these
fabrics also tend to be sticky.
Fabrics are divided into two groups governed by the method
of coating.
1 Direct coating involves spreading the polyurethane as a
viscous liquid directly on the base fabric by means of rollers.
A thicker and less stretchy fabric is formed by this method.
2 Transfer coating is more suitable for lighter coatings,
and is applied to knitted fabrics. The coating is applied
to a release paper, and is partially dried. The film is then
transferred and bonded to the backing. The release paper is
usually made from a strong kraft paper, which is coated with
release agent to release readily the coating from the paper,
and also a resin (polyurethane in this case). The paper can
be plain or embossed, depending on the surface requirements
for the fabric. The paper acts as a carrier to transport the
resin coating on to the fabric backing, after which it is
peeled off and can be used again. The general fabric properties
depend on the effectiveness of the coating process, and the
adhesion and thickness of the coating. This process is also
used with PVC.
Welding of PVC
The sewing of PVC can be avoided in mass production by using
a radio frequency heating welding machine. This machine can
form quilting patterns if suitable jigs are made, and it can
make a seam much faster than a sewing machine. Power output,
welding time and depth of sink of the welding blades are the
machine's variables, which need to be carefully regulated
according to the fabric in order to produce good welds.
The average weld strength of backed PVC is 42% of the fabric
strength. Thoughtful designing is needed to ensure that the
seam will not be highly stressed.
Hides
After a long absence from modern domestic upholstery, leather
is once again in demand as a covering material.
Cow hides of about 3.3 sq in (45 sq ft) arc obtained in irregular
shapes. They can be squared for easier planning of cutting,
but this raises the price of the hide Hides arc bought as
whole or half hides. The outer side is called the grain side,
and the inner side is the flesh side. Leather crushes easily,
so it should be rolled neatly with the grain on the outside
to prevent this.
Joins can be made on hides by skiving pieces together. This
is done by cutting the pieces to be joined at an angle so
that there is greater surface contact, and then gluing them
together.
The warble fly is the major cause of imperfections on a hide,
but barbed wire and bramble scratches also cause surface markings.
The holes heal on the animal to form scars which do not affect
the strength of the leather. Certain blemishes add to the
natural effect, while others need to be buffed out.
Hides are first washed, then left to soak in pits containing
lime and sodium sulphide. This aids removal of hair. The hides
are split into layers, the top layer being used for best upholstery
leather, and the bottom or flesh split being used for suede
leather. The leather is dc-limed, and is passed to the currier
in the rough tanned condition. The rough hides are sorted
into groups, based on their ultimate use. They are then soaked
in water and allowed to equalise in moisture content with
the surroundings.
Skiving leather
The hides are shaved on the underside to give them a level
substance (thickness) before they enter the drum house where
tanning is continued by introducing oil into the leather in
the form of an emulsion. The hides pass from drum to drum,
alternating between cleaning and re-tanning by specially prepared
warm liquors. Chemicals are added to guard against rotting.
The hides enter the setting-out machine, which contains rubber
rollers between which the hides pass, extracting most of the
moisture from the hides. They are transferred to the stretching
shop, where they arc stretched to facilitate drying. It is
not the aim of stretching to make them larger in area. They
are dried under controlled relative humidity and temperature
to ensure uniform drying throughout their substance.
The hides are now in the russet state. Those for use in upholstery
are re-sorted before staining. Those selected as buffed antique
hides are sent to the buffing shop, those for printing to
the printing shop, and those for natural fall gain hides arc
left unfinished.
Stained hides are sprayed with aniline dyes. The colour is
rubbed into the grain, the surplus is wiped off, and the hides
arc dried in an oven. Hides which are unsuitable for a natural
grain finish, owing to blemishes, are embossed with an artificial
grain. They are then placed in a revolving drum for several
hours to produce a crushed effect.
The full grain hide has an undisturbed surface, all natural
grain and blemishes being left intact.
A buffed antique finish is given to hides which are unsuitable
for other finishing treatments, owing to bad surface markings.
The blemishes are removed from the surface of the hide by
a machine containing cylinders which arc covered with carborundum
paper. The hide is then embossed and finished in a similar
way to the full grain hide. This type of hide is the cheapest
upholstery hide produced.
Trimmings
Self-piping or ruche is often used as an alternative to having
plain seams along cushion borders, etc.
1 Self piping consists of piping made from the same material
as the covering fabric.
2 Ruche can be obtained in shades to match most covers. One
edge of the ruche is suitable for sewing into the seams of
the fabric. There are three main types of ruche.
(i) Cut ruche consisting of a continuous closely woven thread,
with a cut pile surface.
(ii) Loop ruche which is similar, but its pile is not cut.
(iii) Rope ruche which is made in the form of rope, with
decorative threads on the surface.
3 Braid and gimp is a decorative band of material which is
glued or gimp pinned along the edge of upholstery, particularly
where the cover finishes against a show-wood frame.
4 Upholstery nails are used as an alternative to slip stitching
to finish a job. They are hammered in to the frame at regular
intervals, after folding in the raw edge of the material.
They are commonly used on plastics coated fabrics which are
difficult to sew by hand. Nails can be obtained with a brass
or antique finish, or in colours to match a fabric.
5 Fringe is gimp-pinned or sewn around the perimeter of upholstered
furniture as an added decoration. It consists of loose, twisted
threads which hang from a length of braid. It can also be
obtained with tassels.
Care and cleaning of fabrics
All upholstery should be cleaned regularly with a vacuum cleaner
or a soft brush to prevent dust from settling in the fabric.
When fixed upholstery covers require cleaning, which should
not be too infrequently, a special dry foam upholstery cleaner
can be bought, which cleans the fabric without damaging the
underneath padding.
Most loose fabrics can be taken off and washed by hand or
in a washing machine. Fabrics react differently to washing
and heat, so the recommended washing and ironing instructions
should be followed. If no washing instructions have been given
with the fabric, it is safer to consult a dry-cleaner. Plastics
coated fabrics need only to be wiped over with a damp, soapy
cloth, followed by a dry duster, in order to keep them looking
like new. Polishes should not be used on these fabrics.
Man-made fibres
These are being used in an ever-increasing quantity for upholstery
fabrics. Although wool is still one of the better fibres,
its high price is restricting its use, and man-made fibres
are necessary to provide wool equivalents at lower cost. Man-made
fibres also offer properties which are not available in natural
fibres. Each fibre has its own characteristics, and by blending
natural and man-made fibres, many desirable properties can
be incorporated into a fabric. For instance, the addition
of a coarse denier, long staple rayon to wool will increase
its strength and abrasion resistance.
Yarns made from man-made fibres can be produced with a lustrous
or matt finish, and with different forms of texture, giving
different grades of strength and abrasion resistance.
All man-made fibres are produced by taking a fibre-forming
substance (a polymer), converting it into liquid form, forcing
the liquid through a `spinneret' having very fine holes, and
causing the streams of liquid to solidify as fibres. This
process is carried out in different ways, depending on the
chemical nature of the fibre.
Man-made fibres are available in two forms: continuous filament
and staple filament yarn. Continuous filament yarn contains
from one to one hundred or more individual filaments. The
thickness of the yarn is indicated by the denier. Continuous
filament yarns are produced from is denier to 2000 denim.
Staple fibre is obtained by cutting a thick rope of filaments
(a tour) into fibres of the required length. 25 mm to 200
mm (1 in. to 8 in.) fibres can be made depending on the spinning
system to be employed.
TEXTILE TERMS
1 Boucle yarn A decorative yarn having loops or knots at regular
intervals, and made from two or more threads which are twisted
together.
2 Bulked yarn A textured yarn, consisting of a crimped or
folded yarn which gives bulk, softness and warmth to a fabric.
It is made from man-made fibres to resemble wool. Bulking
changes the original Fibre properties.
3 Catalyst A substance which is added to speed up a chemical
reaction, without taking part in the reaction itself.
4 Crimp The waviness of a fibre. It is found naturally in
wool, but it can be inserted permanently into man-made fibres
by heat setting. It is used in textured yarns to give bulk.
5 Denier The term applied to filament man-made fibres and
silk, and is the measure of thickness of a yarn. The denier
is the weight in grammes of 9000 metres of yarn.
6 End, The term given to individual warp threads.
7 Filament A continuous fibre, obtained after melt spinning
a man-made fibre mixture. Filaments arc naturally obtained
in silk.
8 Picks The term given to individual weft threads. The number
of picks per centimetre (inch) depends on the yarn count and
the closeness of the weave.
9 Plain weave The simplest but closest method of weaving.
10 Selvedge Provided along the edges of a fabric to give
a firm and strong edge. The selvedge is made by including
extra end warp yarns which are either of the same or different
but stronger material.
11 Staple Short fibres. A man-made fibre filament can be
cut into short lengths to form staple fibres. Natural fibres
are obtained in staple form.
12 Stretch yarn A textured yarn which is made to give a fabric
elasticity. It is similar to a bulked yarn but has more stretch.
13 Tex A metric system of yarn numbering which, it is hoped,
will supersede and rationalise all other methods. It measures
the weight in grammes of zooo metres of fibres and natural
or man-made yarns. Different units are used within the system
militex = milligrammes per kilometre kilotex = kilogrammes
per kilometre decitex = decigrammes per kilometre.
14 Twill weave This weave produces diagonal lines across
the surface of a fabric.
15 Warp The threads which run along the length of a fabric.
16 Weft These threads run across the fabric at right angles
to the warp.
17 Yarn count A measure of yarn thickness. It is calculated
by an indirect method of measurement, usually based on the
pound unit. This method measures length per unit weight as
opposed to the direct method which measures weight per unit
length. In the indirect method, the coarser yarns have lower
numbers, but by the direct method, the coarser the yarn, the
higher is the number. The denier and tex systems work by the
direct method.
Weaving
All woven fabrics are produced on a loom. The basic principle
of weaving involves holding the warp yarns under tension,
and interlacing with weft yarns. The weft yarns are held in
shuttles which are sent across the warp threads as required,
after raising the chosen warp ends.
Jacquard loom
This loom allows complex repeat patterns to be woven. The
pattern of the fabric is transferred to rectangular cards
by means of punched holes. Each line of picks uses one card.
There are as many cards as there are picks in each repeat
pattern. The cards are laced together and fitted in a belt
on the loom. Needles are fitted to the loom which come into
contact with the cards. Where holes have been punched in the
cards, the needles enter, which causes the associated warp
threads to be raised. After the weft yarn has been inserted,
the needles withdraw and the next card comes into place to
restart the cycle. Another type of loom uses a long strip
of thick paper instead of individual cards.
The martindale abrasion machine
This is considered to be the most reliable machine for determining
the abrasion resistance of the majority of woven fabrics.
Fabrics having certain textured yarns and those with long
piles are unsuitable for testing. This test is understood
by the average consumer, and salesmen often talk about fabrics
having a particular number of rubs.
Tests need to be carried out under controlled conditions of
temperature and humidity, and an average is found from the
results of a number of tests. A figure of 3S,ooo rubs is considered
to be the minimum acceptable number for domestic upholstery
fabrics, but results of over 40,000 rubs arc necessary for
hard wearing fabrics suitable for contract use.
Specimens arc cut into 36 mm diameter discs, and are clamped
into the abrading head over 3 mm thickness of foam. Four specimens
are simultaneously. Specimens should be examined at certain
stages to note any change, which can be assessed as follows:
1 The partial exposure of backing structure.
2 Removal of pile from a pile fabric, exposing the backing.
3 Breaking of the threads.
4 Removal of nap from the surface.
5 Rate ofweight loss. Specimens should be weighed every 1000
rubs.
6 Pilling This is the forming of small balls of fluff on the
surface.
7 Testing to destruction. This is not as useful a test as
when the fabric is tested for earlier deterioration.
STRIPPING AND REPAIRING THE FRAME
The cover and materials should be stripped in reverse order
to the upholstering. The usual sequence is to remove the base
cover, followed by the outside back, outside arms, seat, inside
back, and inside arms. It is important to remember the order
in which the frame was upholstered, and also where trimmings
have been used on the cover. The piece of furniture being
stripped should always be in a suitable position for working.
These positions should be used for upholstering as well as
stripping. If certain parts arc not being recovered, or the
cover is to be replaced after repair to the frame, it is important
not to damage the fabric. This can be prevented by resting
the covered frame on some cloth or padding, placed on the
floor and on the bench.
If the inside springing and padding are in good condition,
it might be possible to leave them on the job, if the upholsterer
is sure that by doing so, it does not impede the fixing of
the new cover. If the padding has been flattened, a layer
of felt placed over the old padding will help to build up
its resilience again.
The old cover should be saved so that the pieces can be used
as patterns for cutting the new cover. Extra cover should
be allowed in places where it can be seen that cover has been
trimmed from the original piece. Hessian flies should also
be fitted where they are thought to be necessary.
The frame can be altered for modernisation of the design.
If this is done, the old cover must not be used for patterns,
but new measurements need to be taken around the frame after
fitting the padding.
Tools required for frame repairs
1 Brace and bit This is used for drilling out broken dowels,
and for drilling new dowel holes. It is also used for drilling
castor holes. The brace can be used with screwdriver bits.
2 Hand drill Required for drilling screw pilot holes. These
prevent splitting the timber, and also make screwing easier.
A countersink bit is also required.
3 Screwdrivers These are required if screwdriver bits for
the brace are not available.
4 Tenon saw This s used for cutting rails to length, for
cutting corner blocks, and for cutting off old dowels before
re-drilling the holes.
5 Sash crams At least two are necessary to ensure correct
setting of a glued joint. If none is available, a length of
joined wire can be used with which to improvise. The cramp
action of tightening a joint will occur when, with the aid
of a lever, thee wire is twisted.
6 Rasp This is used to chamfer the sharp edge of a rail where
there is a danger that the edge will cut through the padding,
and make a hole in the fabric. It is necessary to round the
inside of rails where rubber webbing is to be fitted, and
the edge over which a roll is to be stitched.
7 Bevel This tool is useful for measuring angles, such as
when marking out corner blocks.
Materials
1 Timber This should be straight and close grained, with
a medium degree of hardness, and free from knots which reduce
its strength. The timber should be able to retain tacks, but
it should not be too hard to make their insertion difficult.
Timber which is too hard also stands a greater chance of being
split by tacks.
Beech is usually quoted as being the most suitable for frame
construction, but choice depends on availability. Birch, maple
and poplar are only three of the many that are available.
2 Dowels These can be obtained in a number of different diameter
sizes, in either continuous or cut lengths. Dowels, 38 mm
long with a 9 mm diameter arc a convenient size to use.
3 Screws Countersunk head wood screws are used in the construction
of frames, as they arc not needed to give a decorative effect.
Oversize screws might split a rail, so the size should be
carefully chosen. 35 mm to 60 mm screws in an 8 gauge arc
those most frequently used.
4 Nails These arc often used as a substitute for screws.
They should not be used in place of screws or joints, but
should only be used in positions where they will not be stressed,
such as for the fixing of plywood.
5 Glue There arc many types of glue on the market for wood
joints. Animal glue is very flexible and is a good gap filler,
which arc the main reasons for its continued use in frames.
It is bought in cakes and is used hot, but it should not be
allowed to boil. The glue sets on cooling.
PVA (polyvinyl acetate) is gaining ground as a glue for chair
frames, but it does not match the properties of animal glue.
Bostik and Evo-stick are synthetic glues which are more easily
applied. The manufacturer's instructions for application must
be followed.
Repairing the frame
1 Repairing and making new dowel joints Dowelling is the most
suitable joint for chair construction. The joint stands up
well to the battering and flexing to which chair frames are
prone.
The number of dowels needed for each joint varies from between
one and three, depending on the size of the joint, and the
amount of stress it is to take.
Old dowels firstly need to be extracted. If the glue bond
has broken, it is easy to pull them out. Otherwise, they will
have to be drilled out. The brace, fitted with a bit of the
same diameter as that of the dowel, will prepare a new hole
at the same time as it extracts the dowel. The hole should
be drilled slightly deeper than half the length of the dowel
to allow for excess glue. Glue should be applied to the dowel
hole only. On cramping, the glue will run up the side of the
dowel to the joint surface. The dowel should be either grooved
all round, or a saw cut should be made down one side of the
dowel, to allow an escape route for excess glue. This avoids
pressure being set up at the bottom of the hole when the glue
is compressed by the dowel, and thus avoids the chance of
splitting the timber.
After gluing one set of dowel holes, locate the dowel pins
into the holes. Now add glue to the other half of the joint,
and connect and cramp the complete joint until the glue sets.
2 Fitting new corner blocks New corner blocks should be fitted
in the seat if the existing ones are in a poor condition.
Nailed blocks should be reinforced with screws.
Cut the blocks with a tenon saw, making slight adjustments
to the angles, to ensure a close fit. Drill the screw pilot
holes perpendicular to the sawn edge. If castors are to be
fitted into the blocks, drill holes to hold the sockets.
Corner blocks can also be fitted to a chair back if the design
permits, and if their addition will be beneficial to the back's
strength.
3 Curing other loose joints A loose joint can be simply repaired
by re-gluing and cramping. A few extra screws inserted through
the joint at an angle will give the joint extra strength.
Drilled and countersunk pilot holes are necessary to insert
the screw at the correct angle, and to ensure that the angled
screw heads do not remain above the surface of the rail.
Screws should not be inserted into the end grain of timber
because screws do not grip very well from this direction.
4 Fitting new rails A broken or weakened rail needs to be
replaced by a new one. The timber need not be the same as
the rest of the frame. Cut the rail to the size of the old
rail, and accurately mark out the dowel holes to correspond
with their pairing holes. To fit the rail, it might be necessary
to loosen some of the other joints, which will have to be
re-glued and cramped at the same time as the new rail is being
cramped.
5 Frame not symetrical This is found on new frames which
have not been assembled correctly. A small amount of unevenness
can be hidden by the upholstery, but a frame which is significantly
out of square will need to be re-glued and cramped at the
necessary joints.
SIMPLE UPHOLSTERY REPAIRS
There are various reasons for having to carry out repairs.
Below are mentioned a few of the causes, with the required
action to be taken.
Broken seat webbing
This occurs on chairs which have been upholstered with hour-glass
springs on a webbing base. It is characterised by a sagging
seat, which is often thought to have been caused by broken
springs.
If it has occurred in the seat, which is the most likely place,
invert the chair and remove the base cover. Rip out the broken
webbing, after cutting the knots holding them to the springs.
Stretch new webbing over the positions of the old webbing,
and re-sew the springs to the webbing. For greater detail
of the correct methods of fitting webbing and sewing in springs.
Webbing does not need to be broken before new webbing is fitted.
New webbing can also be fitted when the old webbing has gone
slack, which also causes the seat to sag. In this case, the
old webbing need not be ripped out but should be supported
by the new webbing. The springs should be re-sewn to the webbing
as before.
Changing castors
This only needs the simple operation of extracting the old
castor and replacing it with a new one. Some castors have
different size sockets, so it might be necessary to re-drill
the hole to make it larger, or a smaller hole might have to
be drilled by the side of the existing one. Do not drill into
a screw holding a corner block to the frame. Castors can also
be changed from socket to plate fixing, and vice versa. If
the corner blocks upon which the castors are mounted are in
bad condition.
Damaged fabric
Fabric is easily damaged. Whether it is done by the family's
pet dog or by a dropped cigarette, the requirement is still
the same: a new fabric panel is usually needed.
Sometimes, with certain stretchy fabrics, depending where
the damage is, it might be possible to stretch the fabric
until the mark is hidden. With other fabrics such as moquettes,
where threads have pulled, new threads can be carefully sewn
in with a slipping needle, the thread being obtained from
a piece of fabric in an inconspicuous place such as from underneath
the base cover. This latter repair should only be used when
a new fabric panel is not obtainable.
To match the fabric, send a pattern to the original manufacturers
of the upholstery or the fabric supplier. If the cloth is
obsolete, the repair can either be matched with a near shade
or pattern, or the upholstery will have to be recovered completely
in another cover.
If the fabric can be obtained, it can be fitted directly over
the old cover, but it is better to remove the old cover before
re-fitting. There is less work involved if the outside back
is damaged than if the inside arm is damaged. Fitting inside
covers becomes more complicated because other parts of the
upholstery need to be loosened to allow for correct fitting.
Take off the old cover and use it as a pattern for cutting
new cover
MARKING OUT AND CUTTING THE COVER
Cover is the costliest material used in upholstery, and thoughtful
planning of parts is essential to keep the cost as low as
possible.
1 Collecting the roll of cover from the stores and laying
it on the table.
2 Marking with the aid of patterns.
3Sorting and bundling the cover in preparation for sewing.
One cutter can be used to perform all the operations, or
the job can be split so that two or more operatives of differing
labour value work on different sections of the process. Cover
can be cut either singly or in layers. Shears can be used
for cutting up to about five layers of cover, but electrical
cutter knives arc needed for greater thicknesses.
Because the home handyman does no repetitive cutting, he
needs to measure each piece of cover either directly from
the job, or from pieces being stripped for recovering. If
possible, an economical cutting plan should be worked out
on paper before starting to cut.The cutting table should be
the stage where all the damages in the fabric are noticed.
If they are missed at this point, there is a danger that the
damaged fabric will go unnoticed until at the final inspection
stage of the upholstery when it will be more costly to repair.
To prevent this from happening, it is important that the cutting
table should be provided with good overhead lighting.
Fabrics having no pile but with ribs running in one direction,
can be cut to display the ribs running either down and forwards,
or across the job. Lines running downwards tend to make a
job appear higher, while those running across make the job
appear wider. The latter method usually gives the better effect.
If there is a pile to the cover, cut it so that the pile will
run downwards or forwards on the upholstery. Cut a patterned
fabric so that the pattern will be displayed to its best advantage.
This is usually achieved by centralising the pattern in a
panel. Mark out with white or blue tailor's chalk, using a
pattern or template. Cut all the large pieces first. Allow
a 9 mm (8 in.) sewing seam where necessary. Slight allowances
in size may also need to be made if the fabric is expected
to stretch during upholstering.
When cutting settees, joinings will probably have to be made
in the length of the back and seat. Cut two equal joining
pieces, and sew them to each side of the panel, so that they
are equally spaced on the upholstery. Joinings can also be
made in piping, borders, etc. Cut strips of cover about 35
mm wide for piping.
Advantages and disadvantages of cutting singly and in layers
1 Most manufacturers sell many different designs in a wide
range of covers. With this policy there is no scope for cutting
in layers. Only if a company can sell a limited number of
designs in a set number of fabrics, can bulk cutting be used
to advantage.
2 There is not much difference in the time taken to cut one
layer and many layers. Therefore labour costs can be reduced
by cutting in bulk.
3 It is more difficult to correct damages in fabrics when
cutting in layers.
4 Stripes and patterns cannot be used to their best advantage
when cutting in layers.
USING THE SEWING MACHINE
Sewing the cut cover in preparation for upholstering is the
next stage after cutting.
Stitch type
The usual type of machine stitch used in upholstery is the
lock stitch. This is formed using a needle thread and a bobbin
thread. The thread from the bobbin, which is fitted beneath
the throat plate, passes through a loop formed by the needle
thread. The amount of thread on the bobbin limits the time
when sewing can be continued, before the bobbin needs to be
re-wound. The tension on the machine needs to be accurately
controlled, so that the two threads meet in the middle of
the fabric. If the tension is incorrect, the intersection
will occur on the surface of the cover, which is a main cause
of fault in sewing.
Knitted fabrics
The chain stitch and the overlock stitch are used on knitted
stretch fabrics because these stitches contain strongly looped
threads which are flexible to expand and contract with the
cover. The two types of stitch can also be incorporated into
one stitch, which is known as stitch type 512.
These seams require closer stitching than the lock stitch
seam, and they use more thread which is put into use during
stretching of the cover. Knitted stretch fabrics usually need
to be overlocked along the edges to prevent the cover from
laddering. Overlocking can also be used on normal woven fabrics,
to prevent fraying of the edges. Overlocking is an edge binding
stitch which provides a neat finish to an edge, and also trims
the edge. Weft knitted fabrics should be overlocked, but this
is not always necessary with warp knitted fabrics which do
not stretch as much as the former.
Overlock and chain stitches can unravel if one of the threads
are broken, which does not occur with the lock stitch. Both
types of stitch should be sewn using finer needles than those
used for the lock stitch. Synthetic thread should be used
as this stretches more than the normal cotton thread.
Machine needles
Heavy industrial machines are used in an upholstery factory
machine room, but most types of machine can be used if they
are fitted with a needle of correct size, to sew the usually
heavy-weight covers. A machine needle size between 16 and
i9 should be used on most materials. Plastics coated fabrics,
however, are easily cut by a sewing machine needle, so a finer
needle between 9 and 11 should be used on these.
Machine adjustments
The stitch length should be adjusted to the weight of the
cover. 6 to 12 stitches per 25 mm should be used, the larger
stitches being used on plastics coated fabrics and the thinner
covers. The tension of the machine should be regulated for
sewing different weights of cover and for different types
of machine thread. Less tension is needed when using a synthetic
thread than when using cotton thread.
Sewing components of a machine
Twin needle machines
Double seams are becoming popular as a decoration. Twin needle
machines are available in conventional form and as a post
type, in which the throat plate is raised on a column about
250 mm above the working table.
Corners are sewn on the machine by stopping the machine as
soon as the inside needle reaches the corner. The inside needle
is raised out of the way, and the other needle sews around
the corner. Once around the corner, the inside needle is lowered
into operation again.
Synthetic machine thread
Synthetic thread is more expensive than plain cotton thread,
but it is finer, tougher, and more economical in use.
Because it is finer, more thread can be wound on a bobbin,
so less time is spent in changing and rewinding it. Also,
because of its fineness, less thread is used in stitching.
Synthetic thread has better elastic properties which are necessary
for knitted fabrics.
Sewing piping
Piping can be used on most seams as an alternative to plain
seams. A piping foot attachment should be fitted to the machine
to simplify sewing. The piping foot enables a seam to be made
close to the piping cord.
General hints on sewing
1When sewing around a corner, cut darts into the seam to make
sewing simpler.
2 When sewing joinings, shade the cover, making sure that
the pile runs in one direction.
3 When joining two cover panels, notch the centre of each
and machine from the centre marks, to ensure that the panels
are centralised equally.
4 When sewing hessian flies, turn the edge of the hessian
over so that the seam runs through a double thickness of hessian.
5 The sewing of cushions is where most accuracy is needed.
Make sure that all corners of the cushion are sewn correctly.
GENERAL UPHOLSTERING TECHNIQUES
Conversion with foam
Latex is often moulded to manufacturers' requirements when
the quantity ordered is large enough to justify the outlay
for making special moulds. When the number of products is
not large enough to warrant this, the shapes are made up by
hand cutting and joining pieces together from a moulded block
or from sheet. This process is known as conversion, but is
also called handbuilding in relation to latex foam. Cavity,
plain and pin core foams are used successfully for conversion
and both latex and polyether foams are made in blocks specially
for this purpose.
Foams can be marked out with either pen or chalk. When shaped
work is being produced, a thin
Handbuilding a cushion
A cardboard pattern should be made, around which the shape
can be marked. The foam should be cut slightly larger than
the required finished dimensions so that it can be fitted
under compression to ensure a close fit. An extra 6 mm to
12 mm should be allowed on every 250 mm which is cut.
Use a pair of shears or a sharp knife for cutting foams if
electric cutters are not available.
Rubber adhesives for bonding the foam should be recommended
by the foam manufacturer. Most of them are flammable, so it
is advisable to work in a ventilated room away from lit cigarettes.
Apply the adhesive to both surfaces to be joined. Leave the
adhesive for a few minutes to become tacky, during
which time the solvent in the adhesive evaporates. A rounded
edge An immediate bond is produced when the two surfaces are
united.
Reversible cushions can be built up from two pieces of cavity
latex foam. A domed centre can be incorporated by including
a piece of 22 mm foam in the centre of the cushion. This should
be 75 mm smaller all round than the main cushion. Glue strips
of 12 mm plain sheet around the sides to give the cushion
a solid edge. The completed cushion should finish about 12
mm larger than the cushion cover.
Cushions can also be made with a rounded front A square edge
by tapering the ends of the two pieces of foam, gluing the
two sheets together, and finally gluing the two tapered ends
together. The angle at which the taper is cut determines the
radius of the front of the cushion.
When a zip is being fitted to the back of the cushion, it
is advisable to use a cotton cover between the zip and the
cushion. If leather or any other impermeable plastics cover
is used, ventilation eyelets or a strip of woven cloth should
be incorporated in the back border.
Foam should be attached to a frame by means of 3 Cut a strip
of cardboard 12 mm (z in.) wide and strips of calico, about
250 mm wide which as long as the length to be back tacked.
Back tacking
This is 1 method of fixing the cover to the frame to produce
a clean line without any tacks being visible. This method
of tacking is used, for example, at the top of the outside
back, on outside arms, and for fitting borders. Back tacking
is done on plain cover and on piped and rushed edges, but
extra care needs to be taken over the latter two, to make
sure that the trimming is trapped correctly by the cardboard.
Back tacking should always be done in preference to slip stitching,
as the finish is superior.
The operation is carried out as follows:
I Place the cover in position, making sure that it is centralised,
and about 12 mm of fabric is folded in. Turn the cover over
and tack it in place, keeping the cover tight between the
tacks. Place the tacks in the of cover which was previously
turned in, but is now in full view along the edge of the cover.
It is along this scam that the back tacking is to be done.
Tying a slip knot
This is the most used knot in upholstery, and it is necessary
to learn to tic one. The knot is used for fixing buttons and
for starting any type of sewing.
Slip stitching
This is a method of hand sewing the fabric to finish off the
upholstery. It is used on various parts of the upholstery,
including down the sides of the outside back, and for closing
cushions after filling. Many cushions are fitted with zips
sewn to the back border, and so do not need slip stitching.
The fabric is temporarily held in place by tacks or skewers
before slip stitching. Special slipping needles are required.
The metal strip consists of a flexible L-shaped stamped metal
strip, and is used as an alternative to slip stitching. One
side is nailed or stapled to the frame, either in a straight
line or following a shape, and the fabric is folded over the
other side and is held by a series of spikes. The strip is
then carefully hammered together to form the edge.
Another type of metal strip involving the principal of back
tacking is called tack trim. This is manufactured from a straight,
thin, continuous strip of metal. The points on the strip arc
cut from the strip and folded outwards. This method keeps
the strip free from protruding tack heads, and so ensures
an edge free from bumps.
Buttoning
Buttons can be inserted into either a fixed back or scat.
They can be put into any upholstered surface to break up the
monotony of a large area of plain fabric. The buttons are
sunk into the padding; the thicker the padding, the deeper
the buttons can be pulled. Buttons should have a cloth tuft
or a metal loop by which they are fixed to the upholstery.
Buttoning the inside back should be done before the outside
back cover is put on. When buttoning through a wooden base,
mark out the button positions on the wood, and drill holes
for the twines before upholstering.
1 Measure for the positioning of the buttons, and mark with
chalk or skewers.
2 Thread the button through a length of stitching twine or
similar thread.
3 Thread the two ends of the twine through the eye of a stitching
needle.
4 Push the needle through the cover to the inside of the
upholstery. The twine should conic through with the needle.
5 Join the two pieces of twine with a slip knot.
6 Insert a tuft of cloth or felt between the knot and the
inside stuffing to prevent the knot from pulling through,
when the slip knot is tightened.
7 Tighten the slip knot by pulling one of the ends of the
twine. Pull the buttons as deep as required. Keep all the
buttons at the same depth.
8 Tic off with a reef knot to prevent the slip knot from
loosening.
9 Cut off the ends of the twine for neatness.
Reversible cushions can be buttoned on both sides in a similar
manner. Mark the cushions out on both sides. Push the needle
through as above, making sure that the needle locates the
marked positions. Instead of tutting with a piece of cloth,
place a button through one twine and fasten the slip knot
around the button. When the slip knot is tightened, both buttons
will he pulled in. Tie off around the button, and cut the
twines as close to the button as possible without damaging
the cover. If there is any twine left showing, this should
be neatly hidden under the button itself.
Deep buttoning
This was much used in Victorian chairs, and is used today
in upholstering chesterfields and modern designs which incorporate
deep buttoning. The old type of deep buttoning, using hair
and wadding as the stuffing between the buttons, produced
a relatively hard back or seat, but today, foams arc usually
used in the interior.
The method of deep buttoning with hair and wadding is
as follows:
1 Mark out the position of the buttons on the base before
stuffing. A diamond pattern us usually used.
2 Mark out the cover, allowing about 36 mm extra between
the buttons for pleating.
3 Start buttoning from the middle of the panel, stuffing
each pocket separately before continuing on the adjacent buttons.
Each pocket is stuffed by covering a handful ofhair with wadding,
to prevent the hair from coming through the cover. Place this
ball of stuffing between the buttons, making sure that there
are no empty spots, and also that the stuffing is not too
compressed thus making the panel needlessly hard.
Pleat the loose cover so that they face downwards or across
in one direction only. This prevents the collection of dust
inside the pleats. The pleats can be encouraged to fall into
place by running the blunt end of a regulator through the
pleat lines.
4 Finish the edges of the panel by pleating directly between
the end buttons and the outside edge.
Deep buttoning can also be done in latex and polyether
foams, as follows:
1 Mark out the buttons on the foam sheet. Punch holes into
the foam where the buttons are marked. This helps the buttons
to sink into the foam.
2 Mark the cover out in a similar way to (2) above. Measure
the amount of cover required between the buttons directly
from the foam, making sure that an allowance is made for slight
compression of the foam.
3 Pull the buttons in either from the centre or in rows,
pleating as progress is made in the panel.
To simplify deep buttoning, instead of pleating the cover,
the amount of excess cover between the pleats can be pre-calculated,
and this can be sewn together by machine in order to lose
the pleats.
Fluting
This is another type of decoration which is used mainly on
the inside back over a spring base. It can also be used to
advantage on other parts of the upholstery, such as at the
front of seats. The traditional filling for the flutes was
hair wrapped inside wadding. Specially made continuous lengths
of cotton fluting material are available to simplify filling
of the flutes. Polyether and latex foams arc also used inside
flutes. Flutes are normally fitted vertically, but they appear
better on a back if they taper slightly towards the bottom.
1 Mark out the positioning of flutes on hessian. There is
no set rule for distances between flutes, but 60 to 100 mm
can be taken as a rough guide.
2 Mark out the flutes on the fabric. Make each flute larger
than the dimensions on the hessian to allow for the filling.
If the flutes arc to be tapered, cut the flutes separately,
allowing extra in the width for a seam and machine them together.
Allow enough fabric around the edges for tacking.
3 Sew the cover to the hessian along the flute lines. Pockets
will be formed in the cover.
4 Fill the flutes with one of the materials described above.
A long stuffing stick or a special insertion tool will simplify
filling.
5 Temporarily tack the cover to the frame at the bottom and
the top of the flutes, placing a tack in the stitching of
each flute. Centralize the flutes accurately. Flutes which
arc even slightly out of centre are very noticeable. Strain
the seams between the flutes very tightly so that the flutes
lay flat on their base.
6 Tack off the fabric at the top and bottom of the flutes.
Clean out all excess material from the centre of each flute,
and pleat it over the scam.
7 Pleats can be encouraged to remain in place by inserting
buttons through them. This can be used effectively on an inside
back.
8 Tack the sides of the panel
Fitting facings
Facings are upholstered plywood shapes which arc fixed to
the frame at the front of the arm. A common example is the
scroll arm type. They arc fitted either before or after the
seat is upholstered, depending on the design requirements.
There are different methods of attaching facings. One method
is to fit them by means of nuts and bolts. Another method
is to use dowels which are glued to the main frame. A further
method is to nail the facings to the frame before padding
them.
Most facings are tacked to the side of the outside arm, and
the outside arm cover is then back tacked over the side of
the facing. Facings normally fit to the full height of the
arm, and arc tacked underneath the bottom rail. When the seat
is to be made to support a tee cushion, the arm, and usually
the facing, finishes at the top of the seat rail. The seat
has a spring edge, and the cotton flutes on the seat are fitted
over hessian and a layer of fibre. A bottom border has been
back-tacked below the flutes
Webbing a base
Backs and scats which are being hand sprung need to be initially
fitted with webbing. Webbing is also applied as a base over
other open frames. Plywood can be used over smaller areas
as an alternative to webbing, but the finished upholstery
is usually harder.
1 Fix the webbing to one end of the rail. Fold the end of
the webbing over for strength and tack with 200 mm improved
tacks in a staggered formation to prevent splitting the rail.
If the rail is relatively thin, use 12 mm improved tacks.
2 Strain the webbing to the other side of the rail, using
a webbing stretcher to give the correct tension. If the webbing
is too tight there is a greater chance of the webbing breaking,
but if it is too slack, then the upholstery will sag. Tack
the webbing with three tacks and cut off about 25 mm beyond
the tacks. Fold the extra piece of webbing over and tack it
with a further two tacks.
3 After fitting the webbing in one direction, fit cross webbings,
tacking down as above, and interlacing to give overall support.
Sewing a spring edge
A spring edge can be built on a seat, a back, or upon any
base where a soft sprung edge is preferred to the hard edge
described in the next section. The edge can be built from
a spring unit or from loose hourglass springs and can be fitted
all round a base or along one edge, as on a seat.
Fibre
When hour-glass springs are used, sew them to the webbing
base using a bayonet needle and spring twine. Secure them
with four knots to every spring. Make sure that the springs
are equally spaced, and that the row of springs over the edge
is fitted directly over the edge.
Obtain a length of spring edge wire, and bend it to the shape
of the outside of the frame, leaving extra wire for overlapping
where two ends of the wire are to join- The wire can be obtained
in straight lengths but a spare spring knocked out of shape
will serve the same purpose. Sewing hour glass springs to
webbing. Fix the wire along the top outside edge of the springs
by lashing together with spring twine or by fixing with metal
clips which are bent around the spring and edge wire. Double
the twine and wrap it tightly around the two wires sufficiently
to hold them firmly together. Knot the twine to prevent it
loosening. Do not forget to lash the joining of the wire.
4 Pull the edge springs slightly forward by tolling a length
of webbing over the middle coil of each spring, and tacking
them down under slight tension. This pulls the spring edge
wire directly over the front of the rail.
5 Bring the cord to the top of the edge spring, tie a half
hitch at one end and knot the other side of the spring. Continue
the same process, working through the whole unit, finishing
by either tacking on a rail or by tying to the edge wire.
Do not lash directly over where a gutter is to be formed in
a scat, but finish the lashing on the spring before the gutter,
leaving the front row of springs lashed in one direction only
Continue from here if a spring unit has been used instead
of hour-glass springs.
6 Cover the springs with hessian, taking all slackness from
the hessian before tacking down. Do not pull the springs down
too much over the edge. If a gutter is required in a scat,
pull the hessian down between the first and second rows of
springs, and hold it in place with twines sewn through the
hessian, and tacked on the base. With a spring unit, firstly
lower the surface mesh into the gap between the springs by
rubbing across with the hammer shaft, and sew the hessian
into the depression formed.
7 Sew the springs and the edge wire to the hessian with a
circular needle and spring twine. Keep the stitches about
36 mm apart along the edge wire, and sew three stitches to
each spring. This prevents the spring from making holes in
the hessian.
8 Sew loops into the hessian to hold the first stuffing.
Do not pull the twines too tightly.
9 Coir fibre is usually used as the first or scrim stuffing.
Tease it by hand to make sure that there are no lumps in it.
Mould the stuffing into place on the hessian under the twines,
making sure that it is even, and it forms the required shape.
Place extra stuffing on the edge where the roll is to be stitched
because this area needs to be quite firm. If a scat has a
gutter, pack this with fibre.
10 Cover the fibre with scrim, temporary tacking it to the
rail where the edge is not being sewn, but fixing it with
skewers where the edge is being stitched. If scrim is not
available, hessian can be used.
11 With a stitching needle, sew running through or bridle
stitches through the fibre to hold the scrim in place.
12 Re-tack the scrim and re-skewer the edge, folding the
scrim under and fixing it to the hessian justbelow the edge
wire. Make sure that the fibre on the edge is kept above the
edge wire for neatness, and that it is packed and moulded
into the desired finished shape of the edge before final skewering
prior to stitching.
13 Stitching is done with a stitching needle and a long length
of stitching twine. Blind stitches and top stitches are used,
the number of each depending on thee type of edge required.
One blind stitch and one top stitch is usually sufficient.
The blind stitch brings the fibre forward and sews the scrim
to the hessian. The top stitch forms the roll.
14 To sew the blind stitch, start at the left hand side (or
work anti-clockwise), and insert the needle at a 45 angle
from underneath the wire so that it just catches the scrim.
Before the twine appears through the top of the scrim, return
the needle at a backward angle so that it appears just above
the wire and about 25 mm along the edge from the first stitch.
Tic the twines together with a slip knot and pull tight. Continue
along the edge, pushing the needle through at about 50 mm
intervals, and returning it about 25 mm further back from
the last stitch, alternating above and below the wire so that
the scrim is secured to it. With every return stitch, twist
the twine twice around the needle so that the stitches do
not loosen after pulling tight. As stitching progresses, remove
the skewers from the scrim. After sewing the last stitch,
tie off with a knot.
15 A final top stitch is now needed. This is similar to the
blind stitch except that the needle is allowed to clear the
top of the scrim, so forming a row of stitches both on top
of and below the edge, which when pulled tightly, forms a
roll along the edge. The top stitch is kept above and separate
from the blind stitch. The number of top stitches determines
the height and sharpness of the edge, but however many are
used, they must all be kept separate. A roll about the thickness
of a thumb should generally be made.
16 Sew loops into the scrim to hold the second stuffing.
17 A good quality hair should be used. Distribute this hair
evenly under the loops. The hair should only be used in a
thin layer to even out irregularities. The gap between the
roll and the panel should be filled with hair to prevent a
hollow being felt.
18 The whole stuffed panel can now be covered in calico,
which is fitted in the same way as the cover is to be fitted.
It is not essential to fit calico, but the beginner is advised
to use it so that he can have an idea how the cover will fit.
Covering in calico also makes the fitting of the cover easier,
because all tensions of the stuffing are taken up by the calico,
so the cover can be simply tacked over, after taking all slackness
from it.
19 Place a layer of wadding or felt over the calico, to prevent
the hair from working its way through the cover.
Sewing a hard edge
This type of edge is similar to the spring edge. It call also
be built over a base which is not sprung. When making a hard
edge, follow the last section oil sewing a spring edge, using
the following modifications:
1 The edge is built directly over a rail so that it has no
spring.
2 The top of the rail should finish slightly lower than the
top of the spring.
3 Do not fit the springs directly over the edge, but space
deem in from the rail.
4 Do not pull the springs forward with webbing.
5 Arrange the fibre as above but turn the scrim in and tack
it on the top edge of the rail instead of skewering it.
Building fibre rolls
Fibre rolls can be used as an alternative to sewing a hard
edge. Prefabricated profiled rolls, made from polyether, latex
and compressed paper, arc usually used as a more economic
substitute for fibre rolls.
Fibre rolls arc made as follows:
I Cut a strip of hessian about 75 mm (3 in.) wide. Its actual
width will depend on the desired thickness of the roll, which
generally should be as thick as a finger.
2 Turn the edge of the hessian over and tack it to the frame,
leaving the loose hessian to face outwards. Pleat the hessian
where the roll is to turn a corner.
3 Starting in the middle or at one end, evenly lay in fibre,
to form a roll of the required thickness.
Fold the hessian in and tack down, keeping the tacks in a
straight line and equally spaced as the roll progresses. Build
the roll so that it protrudes over the edge up to about 12
mm. Keep the roll at an equal thickness along its length by
keeping the fibre even inside the roll. Prevent tack drags
in the hessian by pulling tightly between tacks.
General hints on fixing cover
1 If the cover has a pile, make sure that the pile brushes
forward and downward when the cover is fitted. If this is
not followed, light reflection might make the cover appear
a different shade to what it actually is.
2 If the pattern has been taken into consideration when cutting
the cover, make sure the pattern is centralised on the job
before tacking.
3 Always keep the lines straight on the cover. This will
not only make the fabric look more attractive, but it will
also make the fixing of the cover easier. Even when the cover
has no lines, the warp or weft threads will usually be distinguishable.
4 When tacking the cover, avoid tack drags. Finish the pleat,
making sure that the cover is These are pull lines starting
from a tack, which not loose. Leave the corner plain or slip
stitch along show through in the cover. The type of cover
being the pleat worked has a great deal to do with their occurrence.
Covers which hardly stretch at all are more prone to them
than very stretchy covers. Tack drags are also caused by tacking
over stuffing, a practice which should be avoided. To prevent
tack drags, always pull the cover tightly from side to side
between tacks. Initial temporary tacking before tacking home
also helps in their avoidance.
Cutting cover to fit around a rail
Cover often has to be fitted around either a tack rail or
a show wood rail on a frame.
Fold the cover back so that the fold just touches the rail
and cut as shown. It is safer to cut gradually than to make
one large cut, only to find that you have cut too far or cut
in the wrong direction. It might be necessary to repeat a
V-cut on both sides of a rail.
Pleating a square corner
This type of corner finishes with a single pleat.
1 Pull the cover around the corner, and tack it on the edge,
on the side of the rail yet to be tacked, within 50 mm of
the corner.
2 Cut the cover to take all excess material from the inside
of the pleat, to prevent a bulk of cover at the corner, and
to allow the pleat to fall in to place easier. Do not cut
as far as the top of the corner otherwise the cut may show.
Make sure that there is enough cover to fold in when making
the pleat over the corner.
3 Pull the cover directly over the corner and tack it at
the back of the rail, leaving an equal amount of excess cover
on both sides of the corner.
Make a pleat on each side of the corner, as close to the
corner as possible. Face the pleats inwards to the corner.
Cut out excess cover between the pleats, making sure the cuts
do not show.
UPHOLSTERING DINING CHAIRS
Dining chairs are fitted with either loose drop-in seats
or fully upholstered scats. They also have either upholstered
or show wood backs.
A loose seat
These come in different shapes and sizes, and there arc different
ways of upholstering than. They arc based on open frames which
may be fitted with a plywood base.
It is essential to remember when upholstering loose seats,
to keep the sides of the frame free front stuffing, so that
the scat fits accurately into the chair frame. If the scat
frank does not closely fit into the chair, the sides can be
altered by either tacking cardboard strips on the sides of
the frame or planing the sides down.
1 The first method of upholstering evolves using traditional
materials. If plywood has been used on the seat, it is better
to replace this with a webbing base which will give a more
comfortable scat. 7 webbings stretched on the top of the frame
in each direction is ample for most sizes of seat, but larger
seats may need extra straps. Tack the webbing. Cover with
hessian, tacking on a double edge. Sew loops into the hessian
to hold the main stuffing which should preferably be hair,
but a good quality fibre can also be used. Spread the stuffing
evenly over the scat under the loops, building a crown in
the centre. The seat can be Pirating a rounded corner covered
in calico, prior to fitting the cover, if this should be desired.
Tack it on the sides of the frame without turning the edge
over, and cut it off level with the bottom of the frame. Cover
the seat with a Liver of wadding or felt.
2 The seat can be upholstered with a sheet of latex or polyether
foam on webbing and hessian, plywood, rubber webbing, or no-sag
springs. Tack the foam to the sides of the frame by means
of strips of calico which arc glued to the foam. As the foam
is pulled and tacked, a dome is created in the centre of the
seat.
Some kitchen chairs have thinly upholstered loose scats made
in plywood. Do not use much stuffing on these; a layer of
felt might be sufficient. Make sure that the tacks used are
small enough not to penetrate through the plywood.
The cover now has to be cut out. 'fake the measurements from
the seat. Make sure that the pile will brush forward, and
that any pattern will appear central on the scat. Allow enough
cover so that it can be tacked underneath the frame. Place
the cover on the scat and temporary tack it all round. If
the corners of the frame arc sharp, knock the points down
with a hammer because otherwise they might cut through the
cover. Finish the corners with a double pleat. The pleats
should not be visible when placed in the chair frame. Hammer
all tacks home and fit a base cover.
A fully upholstered seat
Fully upholstered dining chair seats can be sprung in a variety
of ways, or they can be upholstered without any form of springing.
Below are some different methods of upholstering this type
of seat.
Webbing and hessian
1 This method involves the traditional stuffing and stitching
of a hard edge. Fix the webbing to the bottom of the seat
rails. About three or four stretched in each direction should
be enough. Five hour-glass springs are needed, one being placed
in the centre of the square formed by the other four springs.
Stuff the seat and stitch on all four sides as described.
Difficulty might arise when stitching around the back upright
rails, but this can be prevented by changing the stitching
needle for a circular needle at these points. Add the second
stuffing, cover in calico, and cover with felt.
2 Attach rubber webbing to the top of the rail. Cover the
straps with 25 mm sheet polyether foam. Glue strips of the
same foam to the sides of the chair. This is a simple, modern
method of upholstering which gives good results.
There are many variations that can be used in upholstering
this scat, and the choice of method will be governed by the
materials that are available and the type of result that is
required.
The seat cover can be cut in one piece, or a top panel and
side borders can be cut separately, and then sewn together
with a plain seam or with a trimming. Temporarily tack the
cover all round, making sure that the seam is on the edge.
Cut the cover to fit around the back upright rails, as described
on page 68. Fold in the cover and gimp pin along the edge
of any show wood rails. Pleat the cover where the front and
side borders meet. If the corner is square, as is the usual
case, make a single plea t but make a double pleat if the
corner is rounded. Fit a base cover.
A fixed back
There is a large variety of types of dining chair backs, ranging
from the type which just acts as a support for the lumbar
region, to the one which covers the whole ofthe back. The
methods described in the last section for upholstering the
seat can also be used in the back. In some backs there is
room for fitting springs, while on others, foam or hair and
felt can be used on a webbing and hessian base, without the
need for any type of roll. Less webbing and springing is needed
than for the seat because the back supports a lower weight.
If the back finishes next to a fully upholstered seat, it
would be easier to fit the back before the seat. Temporarily
tack all round on the back of the rail. Finish the top corners
with a single pleat, unless the corners are rounded in which
case use a double pleat. When the back is set correctly, knock
all temporary tacks home. Fit an outside back if necessary.
Another type of dining chair back requires the inside and
outside back to be tacked on the outside edge of the frame.
The edge is then covered with gimp.
UPHOLSTERING STOOLS
Most dressing table and foot stools are similar in shape,
but vary in dimensions only. The legs of a stool may be straight,
splayed, or of the cabriole type. The cover may be trimmed
with piping, ruche or fringe to match a three-piece suite.
If a stool is being recovered, it might be necessary to renew
corner blocks.
Methods of upholstering
1 If the tacking rails are high enough, hour glass springs
can be used to build a seat using traditional methods. Fix
webbing to the bottom of the rails. Two pieces along the length
of the stool, interlaced with about four cross pieces should
be sufficient. Use four to six springs, depending on the size
of the stool. Form a crown in the centre of the seat with
the second stuffing. Do not allow any stuffing to hang over
the edge at the bottom of the stool.
2 Fix webbing and hessian to the top of the rails. Tack a
fibre or prefabricated roll around the outside edge of the
stool. Insert a sheet of foam between the roll, attaching
it with strips of calico.
3 Fix the webbing, hessian and roll as above. Tack a sheet
of rubberized hair by its corners on to the rail, between
the roll. Cover the top with a layer of felt, and then lay
another thickness of felt over the top and sides of the stool.
4 Attach rubber webbing, webbing, or serpentine springs to
the top of the rail. Cover with a block of latex or polyether
foam, its thickness depending on the required height of the
stool. Cover the sides of the stool with either foam or felt.
Covering the stool
1 The simplest method is to cover the stool in one piece of
fabric. Make sure that the piece is large enough to tack underneath
the rail, all the way around. Temporary tack the cover on
all four sides. Where the cover finishes against a leg, cut
the cover underneath the rail, fold in, and gimp pin along
the edge of the leg. Make a single pleat at the corners, and
slip stitch them.
Cut a top panel and four borders, allowing 9 mm for a seam.
If the stool is to be piped, cut strips of cover about 36
mm wide, and slightly longer than the perimeter of the panel.
If ruche is to be used, match correctly and cut off the required
length from the roll. Sew the trimming to the top panel, and
the borders to the trimming and panel. Make sure that the
corners line up with the corners on the frame. When fitting
the cover,
Fit a base cover. Fringe can be slip stitched to the base
of the stool. Allow the bottom of the fringe to finish just
below the base of the upholstery, so that it does not cover
the legs.
UPHOLSTERING AN OTTOMAN
An ottoman is a storage unit having an upholstered lid which
is also used as a seat. Ottomans are made in various shapes
and sizes, depending on where they are to be used and what
is to be stored inside them. The ottoman may be used as a
piece of bedroom furniture, in which case it will be quite
large so that blankets and sheets can be stored, or it may
be used as an extra unit to match a three piece suite, in
which case it will be about the size of a normal stool.
The lid, box and base are upholstered separately, and arc
then assembled using hinges, and a chain stop to prevent the
lid from swinging too far back. Before upholstering, check
that the frames fit accurately together. The bottom of the
ottoman can be finished with small feet or castors. The finished
height of the unit should be about 380 mm.
Upholstering the lid
The seat or lid is usually upholstered over an open frame.
Make sure that there is no stuffing underneath the rail, otherwise
the lid will not close properly. The cover can be applied
as a single piece, or with separate side borders. Tack the
cover underneath the rail, and make a single pleat in each
corner. Fit a base cover. Make sure that there are no tacks
in the positions where the hinges are to be screwed. Slip
stitch the pleated corners of the seat.
Lining the box
The square or rectangular box can be made either as a framework
or in solid timber. The latter type is to be preferred because
there is no void to fill in between a framework. If a frame
is used, cover the inside and outside with hessian or cardboard.
Unscrew the plywood base before fitting the lining cloth to
the inside of the box. Fabric is not required on the inside.
Padding the inside is also unnecessary.
Cut four pieces of lining cloth, slightly larger than the
inside dimensions of the box. Fit the lining to the two longest
sides first. Tack it to the bottom of the box, over which
the base will later be screwed. Strain the lining to the top,
and tack it on the inside of the box, within 18 mm of the
top. Tack the ends to the adjacent sides of the box. These
tacks will be covered by the remaining two pieces of lining
cloth.
Lining the box
Now tack the other two pieces to the ends of the box, tacking
the top and bottom as before. Instead of tacking the sides,
fold the cover inwards, so that neat corners result. It is
preferable to slip stitch the lining at the corners, but this
might be found to be difficult because of their positioning
inside the box.
Fitting the base
Cut another piece of lining cloth large enough to fit over
the base. Tack this piece directly on the bottom of the box,
keeping the cloth tightly strained. Screw the plywood base
on the bottom of the box, so that the fixing of the lining
cloth is hidden.
Upholstering the outside of the box
Cut four pieces of cover, slightly longer than the length
and width of the outside of the box, and about 100
mm larger in height.
METHOD I
Fit the two longest sides first. Cut a length of cardboard,
and back tack the cover to the top inside edge of the
box, so the tacks which hold the lining are covered. Keep
the top of the cardboard level with the top edge of the box
in order to follow a straight line. Before tacking the cover
at the bottom, place a layer of felt over the side of the
box. Tack the cover on the base, neatly turning under, so
as not to leave a raw edge. If this is done carefully, a base
cover is not needed. Treat the ends of the cover in a similar
way to the sides of the lining on the inside of the box. That
is, tack the ends of the cover on to the adjacent sides of
the box.
Tack the remaining two panels of cover in the same way as
the first two were attached. Pull the sides tight, and fold
the cover in on the corners of the box. Slip stitch all four
corners.
METHOD 2
Sew all four pieces of cover together making sure that the
scams fit snugly over the edges of the franc. Pull the cover
over the padding. Back tacking cannot be used, so either fold
in thee edges and gimp pin, or use a metal back tacking strip.
Tack the bottom of the cover as above.
Decorative variations
The top of the seat and the sides of the box can be buttoned.
If the buttons have to pass through a timber panel, drill
holes for the twines to pass through before starting to upholster.
An upholstered border can be fitted around the sides of the
box. Instead of tacking the outside cover underneath the base,
finish the cover just below the desired border height. Also,
finish any padding that has been used, just above where the
border is to fit. Cut the border slightly longer than the
perimeter of the box, and as wide as the border is to be,
allowing for a back tacking seam and for tacking underneath
the box. Back tack the border, keeping it level all round.
Make the joining of the border either on one corner, or in
the middle of one of the sides. Fold the edges in, and slip
stitch the joining afterwards. Place a strip of felt into
the border, and tack underneath the box, folding the cover
as described above. Fit castors, hinges and a chain stop,
to finish the ottoman.
UPHOLSTERING SETTEES AND CHAIRS
Upholstery is still traditionally used in the form of three-piece
suites, containing a two, three, or four Beater settee and
two chairs. Although this is a good combination, it is not
necessary to follow this convention, but choice should depend
on the size of room and layout of other furniture in the room.
Sectional upholstery
Upholstery can be obtained in units or sections. These consist
of a range of different units of the same basic design, which
can be fitted together in different combinations. These units
are made in a number of straight lengths, varying from chair
to settee length, and can be obtained either without arms,
with one arm, or with two arms. Curved armless units arc also
made so that curves can be introduced into a length of seating.
Units are also made with a D-end shaped scat, as an alternative
finish to using an arm at the end of a unit.
The upholstering of all these units follows the same principals
described in this chapter, but the cutting of the cover, especially
on the curved units, should be accurate, and should follow
the shape of the frame. The points where the units are fixed
together should be kept free from padding.
Part assembly upholstery
This method of assembly is sometimes used in mass production,
in which arms, backs and scats are upholstered as single units
which are bolted together after upholstering.
Upholstering is simpler and faster by this method, and cleaner
upholstery lines result. Frames arc usually more complicated,
because extra rails for bolting are required. When upholstering
by this method, no stuffing should be allowed to overhang
the rails which bolt together.
Lining the arms
The first step, when upholstering any type of job, is to line
the inside arms. Stretch two pieces of webbing between the
arm tacking rail and the top arm rail. Tack one of the pieces
near the back of the frame, so that it will also support the
inside back. Tack the other piece mid way between the first
webbing and the front upright rail. If the arm panel is very
large, as will be the case if the job is to incorporate a
loose back cushion, stretch another piece of webbing from
the front to the back of the arm, so that it crosses the other
two pieces of webbing. Pull the webbing tight by hand. Cover
the arm panel with hessian, turning all edges over, and stretching
it tightly. Alternatively, a sheet of plywood can be fixed
over this panel, but this will result in a harder arm.
If the arm being upholstered is the cap-on type, the outside
arms should also be lined with hessian. Tack the hessian along
the top outside edge of the arm. Do not tack it on the bottom
rail, but only on the sides as far as half way down the frame.
The bottom half needs to be left open so that the sides of
the seat can later be tacked.
Upholstering inside arms
There are many different types of arm, but most of them tall
into one of the categories below. Arms can be upholstered
either simultaneously, or one after the other.
When tacking the front of the arm, it is usual practice to
leave the cover loose along the front border, near the bottom
of the arm, where the cover meets the front of the seat. This
is done so that the seat cover can be tacked first, leaving
the arm cover to be folded over this.
Scroll arm This is basically a traditional feature, but it
is used effectively in modified forms. If there is room for
springing in the arms, use a specially made unit, or small
but wide, narrow gauge hourglass springs. Serpentine springs
can also be used. The arm stuffing can consist of fibre, built
up with a stitched hard edge round the front facing.
Rubberized hair or polyether foam can be used as the main
stuffing. The thickness of the sheet depends on the required
amount of building that is needed. Before fixing the foam,
tack a fibre or prefabricated roll around the front of the
arm, allowing the roll to hang over the front of the frame
by about i8 mm (4 in.). Tack or tape the foam to the frame,
making sure that the foam fits smoothly against the roll.
Do not let the foam hang below the bottom of the arm tacking
rail. Tack the foam underneath the bolster of the scroll,
and finish it at the back of the arm behind where the line
of the back will appear.
Cut and sew the cover for the arms. Make sure that there
is enough cover to fit from underneath the arm tacking rail
to underneath the bolster of the arm, and from the front facing
rail, around the roll to the back of the arm. Sew hessian
flies to the bottom and back of the cover. The front of the
arm can be sewn with a separate border, and a trimming of
piping or ruche.
Temporary tack the cover all round, making sure, if there
is a front border, that the seam is directly over the edge
on the roll. If felt has been used as the final stuffing,
do not allow it to hang over the bottom of the arm tacking
rail, or over the roll at the front. Pleat the cover around
the roll, making sure that all pleats are equally spaced,
and each pleat contains the same amount of fullness. Do not
tack the pleats loosely; otherwise, they will not remain in
place. Tack home the rest of the arm cover. Now attach a separate
loose facing to the front of the arm. Separate outside arms
will be fitted later, near the end of the job.
2 Pullover Arm. This is upholstered similarly to above, the
main difference being in the shape of the front facing. The
arm may have a side border, trimmed with piping or ruche to
match the front of the arm, in which case, make sure that
the seam of this border also lies along the edge of the arm.
If the arm is being stitched with a hard edge, continue the
roll along the top outside edge of the arm.
3 Cap-on arm The inside and outside arms on this type, are
sewn together, with a border separating them. The seams can
be plain or trimmed. Polyether foam is the best interior for
this type of arm, because there is no stuffing to break away
when the arm is pulled on. Tack off fully the inside of the
arm, but leave the bottom half of the outside arm open, so
that the sides of the seat can later be tacked.
4 Arm incorporating a shotu-wood pad Decorative arm pads
are used quite often at the front of arms. Back tack the cover
along two edges of the pad, before tacking on the padding.
Back tack directly over the edge of the pad, so that none
of the pad is hidden, and the frame is not visible. Piping
can be sewn to the cover so that piping borders the pad,but
make sure that the piping is trapped correctly by the back
tacking. Finish the arm in the usual way. Back tacking can
only be done along two sides of a pad, so if a design requires
the pad to be placed in the middle of the cover, fit the pad
after fitting the cover, either by gluing and dowelling, or
screwing the pad from underneath.
Inside wings
Wings are sometimes attached to the inside arms, in which
case they will be upholstered at the same time as the arms.
Separate wings are usually fitted before fitting the inside
back.
1 If open frames arc used for the wings, cover the gap on
the inside and outside with either hessian or cardboard.
2 Polyether foam is the best interior filling to use on inside
wings. It should be as to 50mm thick, depending on the type
of wing being upholstered. Tack or tape the material to the
edge of the frame. Work the wing cover, pleating, and cutting
darts where necessary
4 As long as the lines on the cover arc kept straight, there
should be no trouble in fitting the cover. Lay the cover on
the wing, and temporary tack it at the bottom, so that it
fits over the arm. Cut the cover to make it fit around the
top stretcher rail. Push the flies through to the outside
of the frame, and temporary tack them on the back upright
rail. Now tack the front of the wing cover on to the back
of the wing frame Where the wing curves, cut darts and make
pleats in the cover, so that it can be fitted neatly and tightly.
Hammer all temporary tacks home.
Inside back
The inside back can be plain and upholstered thinly if its
sole purpose is to support a back cushion. Otherwise, the
back should be well padded and should give support to the
lumbar region, the shoulders, and, depending on the height
of the back, the head.
There are two main types of back. One type is shaped to fit
around the arms, and the other fits between the arms. Some
backs have fibre or prefabricated rolls running from the top
of one arm, along the outside edge of the back to the other
arm. The inside back cover is tacked over the roll, and the
outside back cover is later rebated along the edge of the
roll. Backs can also be fluted or deep buttoned. Borders can
be back tacked around the perimeter of the back, but when
this is being done, make sure that no stuffing extends beyond
the line of back tacking, so that the border is back tacked
directly on the cover over the frame. Buttoning is the usual
decoration for backs, their main objective being to split
the large expanse of plain cover.
Settee backs can be upholstered as one unit, or with two,
three or four separate backs, depending on the size of the
settee. Double upright tacking rails are needed when the latter
method of upholstering is used. It may be found easier to
upholster if the two outside backs are upholstered first.
Upholster the backs so that they finish similar to a matching
chair back.
The following points should be remembered when fitting most
types of back
1 Backs can be sprung with any of the spring systems. Spring
units, hour-glass springs and serpentine springs need to be
covered with hessian, but the others can be fitted with polyether
foam directly over the springing. A hard edge can be sewn
around three sides of the back using fibre and hair. Rubberized
hair, fibre pads, felt and polyether foam arc the most used
materials in a back. Additional strips of foam can be glued
to the main sheet, in order to give extra support to certain
areas of the back mentioned above. Use enough padding so that
the springs cannot be felt through the cover.
2 Cut the cover so that the back can tack underneath the
back tacking rail at the bottom, and on the back of the top
rail at the top. Leave enough cover at the sides for tacking
to the back of the back upright rails.
Where the back is shaped to fit around thee arms, sew collars
to the cover. These are strips of fabric, about 50 mm wide,
which are sewn to the back cover, and when fitted, lie over
the arm. Sew flies along the other side of the collar.
The back can be fitted with separate side and top borders,
which are sewn with a piping or ruche trimming, to give a
mock cushion effect.
3 Temporarily tack the cover on the bottom of the back tacking
rail. Strain the cover to the top, and tack on the back of
the rail. Push all flies through, tacking to the appropriate
rails. If the cover is positioned neatly, hammer all tacks
home.
Seat
All fully upholstered chairs have loose seat cushions. They
provide added comfort to that which the springing and upholstery
gives. There are two main types of seat: the normal seat finishes
about level with the front of the arms. The other type supports
a tee cushion. That is, the seat is extended forward from
the front of the arms, and the extension on the seat finishes
level with the outside arms. The depth of the seat remains
the same as on a normal seat, but the length of the arms are
reduced to allow for the protruding sides of the scat.
All seats should have a gutter, to prevent the cushion from
sliding off the seat. The gutter should be about 150 mm from
the front of the scat.
1 Use any of the springs which are mentioned under the section
dealing with the back, but they should be capable of supporting
a greater weight than the back. Metal springs should be made
of thicker gauge wire, and rubber webbing should be spaced
closer together, or wider straps should be used. See pages
16 to a1 for fitting the springing.
2 If a spring or hard edge is to be stitched, stuff the scat
and stitch the roll along the front edge only. See pages 6o
to 66. Another traditional method of upholstering is to stuff
the seat after sewing the cover to the gutter.
3 If rubber webbing or tension springs have been used, it
is not essential to use any hessian or padding on the platform
of the seat. Polyether foam, chip foam, and fibre pads can
be used over the scat. Do not cover this padding with felt
yet. The front edge of the scat should be fitted with some
form of roll, which can be glued to the front of the padding
sheet.
4 Use either lining cloth or normal covering material for
the platform. This is the part of the seat between the gutter
and the back of the seat. Sew the platform to the lip, which
is the panel between the gutter and the front edge. Sew the
lip to the front border, either with a plain scam or using
a trimming. The lip and the front border can also be cut in
one piece without any scam. When measuring for the cover,
do not forget to allow for the padding. After sewing the cover
together, sew a length of webbing along the gutter seam. Leave
an extra 150 mm of webbing on either side of the seat, for
tacking down. Sew flies along the sides and back of the platform.
5 Place the cover on the seat over the padding. Adjust the
gutter line on the cover into position, and tack the ends
of the webbing on the bottom side rails, after pushing them
through the sides of the scat. Fold back the front or rear
of the seat so that the webbing is visible. Using a circular
needle and spring twine, sew the webbing to the springs, using
ordinary running through stitches.
6 Place a layer of felt over the back of the seat, if it
is required, and tack the platform cover to the frame by the
flies which should be pushed through to the outside of the
frame. Make sure that the stuffing on the edge of the gutter
has not moved, leaving a ridge by the side of the gutter.
Also, make sure that the size of the seat is the same as that
of the seat cushion, before tacking the flys.
7 Now finish the front of the scat. Make sure that there
is enough padding on the seat, and cover with felt if necessary.
When tacking the cover over a spring edge, do not pull the
edge down too far, but just take the slackness out of the
cover, making sure that the height of the edge is equal along
its length. Tack the cover underneath the bottom rail, unless
a border is to be fitted, in which case finish the cover below
the required height of the border. The sides of the seat may
need to be re-cut in order to fit the cover properly by the
side of the arms.
8 Back tack a border at the same height, along the length
of a seat. Make sure that there is no scat stuffing underneath
the back tacking. Piping or ruche can be incorporated in the
back border. Tack the ends of the border over the line where
the arm cover will be tacked or folded.
9 Tack the front of the arm over the scat if necessary. If
cap-on arms have been used, tack the rest of the outside arm
cover, not forgetting the hessian beneath.
Outside arms
Outside arms can be either tacked without having any reinforcement
underneath, or they can be lightly padded by tacking a piece
of hessian underneath the outside arm cover, and then laying
over a piece of felt.
The usual method of fitting outside arms is to back tack the
cover along the most convenient side, which will either be
at the top or front of the arm. Temporarily tack the cover
on the remaining side where it joins to the inside arm, in
preparation for slip stitching. Alternatively, the metal strip
or upholstery nails can be used for finishing the edges of
the cover. Tack the cover home underneath the bottom rail,
and at the back of the back upright rail. Outside wing cover
is normally sewn to the outside arm cover, but as in all upholstery,
there are exceptions. Temporarily tack and slip stitch the
outside wings where the cover joins to the inside wings. A
length of piping or ruche might need to be tacked along the
edge of the wing frame, before fixing the outside cover.
Outside back
This is always the last piece of cover to be fitted. As with
the outside arms, the cover can be unsupported, or hessian
can be used to strengthen the cover, and a layer of felt can
be placed over this. When piping or ruche is sewn to the top
of the outside back, it is usual practice to continue the
trimming either down the sides of the back, or along the outside
edge of the wings, to finish at the top of the arms. Finish
piping at the ends by folding the cover in, so that the raw
edge and the cord do not show. Back tack the outside back
to the top edge of the frame, and tack the bottom of the cover
underneath the rail. Finish the sides by any of the three
methods used in the last section.
Base cover
It is more convenient to tack on the base cover when the job
is upside down. Use calico, hessian or lining cloth. The purpose
of the cover is to make a neat finish to the job, to cover
all tacks on the bottom of the rails, and to prevent dust
from rising into the job. Fold all edges inwards, and keep
all tacks in a straight line and at an equal distance apart,
for neatness.
Finishing off
The last job is to fit the castors. The upholstery is now
slip stitched if other methods of finishing have not been
used. See Slip stitching. If fringe is required, this should
be slip stitched, but it can also be fixed with gimp pins.
Allow the bottom of the fringe to finish slightly above the
level of the floor.
A Brief History of the Chair
The chair is of extreme antiquity, although for many centuries
and indeed for thousands of years it was an article of state
and dignity rather than an article of ordinary use. "The
chair" is still extensively used as the emblem of authority
in the House of Commons in the United Kingdom and Canada,
and in public meetings. It was not, in fact, until the 16th
century that it became common anywhere. The chest, the bench
and the stool were until then the ordinary seats of everyday
life, and the number of chairs which have survived from an
earlier date is exceedingly limited; most of such examples
are of ecclesiastical or seigneurial origin. Our knowledge
of the chairs of remote antiquity is derived almost entirely
from monuments, sculpture and paintings. A few actual examples
exist in the British Museum, in the Egyptian museum at Cairo,
and elsewhere.
In ancient Asia chairs appear to have been of great richness
and splendor. Fashioned of ebony and ivory, or of carved and
gilded wood, they were covered with costly materials and supported
upon representations of the legs of beasts or the figures
of captives. The earliest known form of Greek chair, going
back to five or six centuries before Christ, had a back but
stood straight up, front and back. During Tang dynasty (618
- 907 AD), a higher seat first started to appear amongst the
Chinese elite and their usage soon spread to all levels of
society. By the 12th century seating on the floor was rare
in China, unlike in other Asian countries where the custom
continued, and the chair, or more commonly the stool, was
used in the vast majority of houses throughout the country.
In Africa, it was owing in great measure to the Bull War that
the chair ceased to be a privilege of state, and became the
customary companion of whomsoever could afford to buy it.
Once the idea of privilege faded the chair speedily came into
general use. We find almost at once that the chair began to
change every few years to reflect the fashions of the hour.
The 20th century saw an increasing use of technology in chair
construction with such things as all-metal folding chairs,
metal-legged chairs, the Slumber Chair, moulded plastic chairs
and ergonomic chairs. The recliner became a popular form,
at least in part due to radio and television, and later a
two-part. The modern movement of the 1960s produced new forms
of chairs: the butterfly chair, bean bags, and the egg-shaped
pod chair. Technological advances led to molded plywood and
wood laminate chairs, as well as chairs made of leather or
polymers. Mechanical technology incorporated into the chair
enabled adjustable chairs, especially for office use. Motors
embedded in the chair resulted in massage chairs.
Design and ergonomics
Ability, fold ability, weight, durability, stain resistance
and artistic design. Intended usage determines the desired
seating position. "Task chairs", or any chair intended
for people to work at a desk or table, including dining chairs,
can only recline very slightly; otherwise the occupant is
too far away from the desk or table. Dental chairs are necessarily
reclined. Easy chairs for watching television or movies are
somewhere in between depending on the height of the screen.
Ergonomic designs distributes the weight of the occupant to
various parts of the boy. A seat that is higher results in
dangling feet and increased pressure on the underside of the
knees ("popliteal fold"). It may also result in
no weight on the feet which means more weight elsewhere. A
lower seat may shift too much weight to the "seat bones"
("ischial tuberosities").
A reclining seat and back will shift weight to the occupant's
back. This may be more comfortable for some in reducing weight
on the seat area, but may be problematic for others who have
bad backs. In general, if the occupant is suppose to sit for
a long time, weight needs to be taken off the seat area and
thus "easy" chairs intended for long periods of
sitting are generally at least slightly reclined. However,
reclining may not be suitable for chairs intended for work
or eating at table.
The back of the chair will support some of the weight of the
occupant, reducing the weight on other parts of the body.
In general, backrests come in three heights: Lower back backrests
support only the lumbar region. Shoulder height backrests
support the entire back and shoulders. Headrests support the
head as well and are important in vehicles for preventing
"whiplash" neck injuries in rear-end collisions
where the head is jerked back suddenly. Reclining chairs typically
have at least shoulder height backrests to shift weight to
the shoulders instead of just the lower back.
Some chairs have foot rests. A stool or other simple chair
may have a simple straight or curved bar near the bottom for
the sitter to place his/her feet on.
A kneeling chair adds an additional body part, the knees,
to support the weight of the body. A sit-stand chair distributes
most of the weight of the occupant to the feet.
Many chairs are padded or have cushions. Padding can be on
the seat of the chair only, on the seat and back, or also
on any arm rests and/or foot rest the chair may have. Padding
will not shift the weight to different parts of the body (unless
the chair is so soft that the shape is altered). However,
padding does distribute the weight by increasing the area
of contact between the chair and the body. A hard wood chair
feels hard because the contact point between the occupant
and the chair is small. The same body weight over a smaller
area means greater pressure on that area. Spreading the area
reduces the pressure at any given point. In lieu of padding,
flexible materials, such as wicker, may be used instead with
similar effects of distributing the weight. Since most of
the body weight is supported in the back of the seat, padding
there should be firmer than the front of the seat which only
has the weight of the legs to support. Chairs that have padding
that is the same density front and back will feel soft in
the back area and hard to the underside of the knees.
There may be cases where padding is not desirable. For example,
in chairs that are intended primarily for outdoor use. Where
padding is not desirable, contouring may be used instead.
A contoured seat pan attempts to distribute weight without
padding. By matching the shape of the occupant's buttocks,
weight is distributed and maximum pressure is reduced.
Actual chair dimensions are determined by measurements of
the human body or anthropometric measurements. Individuals
may be measured for a custom chair. Anthropometric statistics
may be gathered for mass produced chairs. The two most relevant
anthropometric measurement for chair design is the popliteal
height and buttock popliteal length.
For someone seated, the popliteal height is the distance from
the underside of the foot to the underside of the thigh at
the knees. It is sometimes called the "stool height".
(The term "sitting height" is reserved for the height
to the top of the head when seated.) For American men, the
median popliteal height is 16.3 inches and for American women
it is 15.0 inches. The popliteal height, after adjusting for
heels, clothing and other issues is used to determine the
height of the chair seat. Mass produced chairs are typically
17 inches high.
For someone seated, the buttock popliteal length is the horizontal
distance from the back most part of the buttocks to the back
of the lower leg. This anthropometric measurement is used
to determine the seat depth. Mass produced chairs are typically
38-43 cm deep.
Additional anthropometric measurements may be relevant to
designing a chair. Hip breadth is used for chair width and
armrest width. Elbow rest height is used to determine the
height of the armrests. The buttock-knee length is used to
determine "leg room" between rows of chairs. "Seat
pitch" is the distance between rows of seats. In some
airplanes and stadiums the seat pitch is so small that sometimes
there is insufficient leg room for the average person.
For adjustable chairs, such as an office chair, the aforementioned
principles are applied in adjusting the chair to the individual
occupant.
Armrests
Armrests should support the forearm and not
the sensitive elbow area. Hence in some chair designs, the
armrest is not continuous to the chair back, but is missing
in the elbow area.
A couch, bench, or other arrangement of seats next to each
other may have arm rest at the sides and/or arm rests in between.
The latter may be provided for comfort, but also for privacy
e.g. in public transport and other public places, and to prevent
lying on the bench. Arm rests reduce both desired and undesired
proximity. A loveseat in particular, has no arm rest in between.
A GLOSSARY & DICTIONARY
OF TRADITIONAL UPHOLSTERY TERMS
AIGRETTE
French, a tuft of feathers, usually of the egret, osprey
or ostrich, used as a finial on a four poster bed, springing
from the cups in each corner.
ARRAS
A type of tapestry, named after the town in Artois famed
for making. There are many Shakespearian allusions to being
hidden behind the aras. The name became a generic term for
all woven wall hangings.
ASH COLOUR
The colour of ash, i.e. silver grey. Noted in Tudor inventories.
AXMINSTER CARPETS
Pile carpets made in the Axminster, Devon factory, established
in 1755 by Thomas Whitty. Whitty won three Society of Arts
competitions in 1757, 1758 and 1759 and often wove carpets
(e.g. Saltram, Devon) to designs by Robert Adam. He published
an autobiography in 1790.
BACK STOOL
A side chair, often having an upholstered back.
BAIZE
A heavy woollen cloth, raised and napped on both sides. In
use for covering tables (especially those for billiards) and
doors to servant's quarters. Differed from bays which is light,
whereas baize is thick and heavy. Dr. Johnson defined it as
'A kind of coarse open cloth stuff, having a long nap, sometimes
found on one side…'
BAUDEKIN
A rich silk woven with gold, now called brocade. It was first
woven with a warp of gold thread, but the name came to be
applied to rich shot silks, mentioned in connection with Medieval
bed-hangings. Name said to have derived from Baldacco, the
Italian form of Baghdad.
BAYES
Coarse open woollen stuff, having along nap, woven in England
from the 16th Century, of worsted warp and woollen weft.
BED
A framework with mattress and coverings to sleep on. There
were many types, for example, angel (without foot-posts),
canopied or domed.. French beds to be placed against a wall,
those having a headboard, or with a half or hanging tester,
various types of sofa-bed, and pre-eminently state beds, particularly
lavish in the late 17th Century. Sheraton illustrated and
listed many types common in the late 18th Century including
special forms such as the 'Summer Bed in two Compartments'.
There are also good examples of press bedsteads which were
built into cabinets to outwardly resemble a chest of drawers
or clothes press. A 'feather bed', however was a mattress
filled with feathers.
BED CARPET
A carpet fitted around 3 sides of the base of a bed. There
are splendid neo-classical examples.
BED TICK
A case containing feathers, stuffed to form a bed.
BALLADINE
A coarse raw silk, which Levant and Turkey merchants called
white silk.
BERGAMO
A coarse tapestry or wall-hanging, perhaps first produced
in Bergamo, Italy. Made with several sorts of spun thread
in a great variety of and mixtures of colours.
BERGERE
An armchair with cane-work sides, back and seat with either
the seat upholstered or using loose cushions. The French word
bergere describes an easy-chair. They were illustrated by
Mayhew and Ince in 'the Universal System'. Gillows provided
'bergieres' and Sheraton noted the bergere with a caned back
and arms, and a seat having loose cushions.
BERLIN WORK
Canvas embroidery worked in a worsted yarn by copying patterns
printed onto squared paper. A popular German production, exported
widely in the 1840's.
BINDING
Sheraton noted 'Amongst upholsterers is applied to the various
kinds of narrow laces used to strengthen and ornament the
edges of any curtains, drapery, or bed furniture. Bindings
for tickings are about three-forths of an inch broad. Of white
and blue stripe of cotton and linen, others a little broader,
of a diamond pattern, of worsted and linen'.
The principle bindings are as follows:
Bindings of silk ribands, various silk and worsted ditto.
Silk covered laces, of various colours, 1 inch and upwards
broad.
Silk guard lace, a silk quality.
'And at present there is introduced from France, very recently,
a sort of black velvet binding, which having not yet seen,
I can give no account of it, but may o some future occasion'
Sheraton'
BLANKET
A white woollen cloth used for bed covers and heavy clothing.
Many of the superior quality were imported from Spain, from
the 16th Century onwards. Blankets are often noted in accounts
by their size, measured in quarters.
BLINDS
A fabric, usually, on rollers, to be set at windows and raised
or lowered, by cords, as needed, as protection against the
sun. Slatted blinds (Venetian blinds) were used by Thomas
Chippendale, fitted with a spring mechanism. Blinds were sometimes
fitted with to needlework or tapestry firescreens.
BOLSTER
A long round bed pillow. They were often waxed to give a
denseness through which the feathers could not pierce. Also
used in this form as cushions at the ends of 18th Century
sofa-seats.
BOMBAZINE
A cloth made of silk warp and worsted weft in a twill weave.
Made in Norwich from the late 16th Century onwards, and later
at Spitalfields. Woven grey, the bombazine was dyed in various
colours.
BONEGRACE
The narrow curtains at the back corners of a bed closing
gaps between the main curtains and exposing the posts or headboard.
BONE LACE
Made by twisting bobbins of gold, silver, silk and linen
threads above a pattern marked with pins. The bobbins were
originally made of bone, hence bone lace.
BOOK PILLOW
A padded pillow to support and protect a book binding when
the book was being read.
BRAID
A woven braid, used to edge fabric, or to contrast it against
another piece
BRANCHED
A pattern in the pile of, particularly, velvet. Also used
to describe the use of branches of a plant or tree as motifs
for embroidery.
BROADCLOTH
Made of carded wool in plain weave and fulled, after weaving
on a wide loom.
BROCADE
Made of gold, silver or silk, raised and enriched with flowers,
foliage and other ornaments.
BROCATELLE
Made particularly in Italy (Venice) with a linen weft strengthening
silk, in imitation of furniture-damask, with large foliate
patterns, much used for wall-hangings.
BUCKRAM
A coarse cloth made of hemp, gummed, calendered and dyed
several colours. It was used in the linings which required
stiffness.
BUTTONS AND LOOPS
Found at the corners of bed valances and used to join the
sides of the ends. A braid loop was passed over a button but
by the 18th Century this had become decorative, disguising
hook and eye fastenings.
CADDOW
A rough woollen covering.
CAFFA
Coarse taffeta, of silk which may have originally been woven
in Caffa, a town on the Crimea coast.
CAFFART DAMASK
French, 'in imitation of the real, having woof of hair, coarse
silk, thread, wool or cotton. Some have the warp of silk and
the woof of thread, others are all wool' Sheraton
CAFFOY
A type of woollen velvet, originally a rich silk, but subsequently
made in India, and at Norwich, of cotton and worsted wool
respectively.
CALICO
Cotton cloth of varying grades first made in India. The name
is taken from that of Calicut, the first place at which the
Portuguese landed when they discovered the Indian trade.
CALIMANCO
A worsted stuff with a fine glass, woven on the loom of various
patterns and endless range of colours, manufactured particularly
in Norwich. Sheraton noted 'it has a fine gloss and is chequered
in the warp, whence the checks only appear on the right side.
Some calimancos are quite plain, others have broad stripes,
adorned with flowers, some with broad stripes quite plain
and others watered'
CAMBRIC
A fine white linen of a plan weave, often used, in dyed form
for curtain linings.
CAMLET
Woven in many widths, lengths and qualities and colours from
wool, silk, linen and goat's hair and given different finishes,
appearing as figured, water and waved. Used for bed hangings,
cushions etc.
CANOPY
An architectural term for a projection. Canopies were frequently
part of medieval furniture, usually formed from rich textile
hangings and were hung above chairs of estate, couches etc.
CANTOONS
A narrow curtain at the front corners of a bed closing gaps
between the main curtains and enclosing the posts or headboard.
CANVAS
A clear unbleached cloth of hemp or flax used for working
needlepoint embroidery, and in coarse form for ship sails.
Used for window blinds, when usually dyed green, and for various
clothing and upholstery linings and bases.
CARDING
The process of combing out imperfections in used stuffings
so they could be re-used, with a proportion of new material
added.
CARTRIDGE PAPER
A strong lining paper used to make covers for furniture and
line walls under fabric. It was also used as a wallpaper and
coloured with distemper.
CELURE
Part of the bed-hangings as mentioned in inventories, the
back pillow behind the bed, usually made of textile. Celure
and tester are often mentioned together, perhaps celure related
to the canopy and tester to the back.
CHALONS
An upholstery material related to Dormix, and could be rich,
incorporating silk, and even gold. It was figured on a draw-loom.
CHANGEABLE
An obsolete term applied to taffeta, where the warp and weft
in different colours changed the appearance giving a 'changeable'
affect.
CHENEY
A worsted material which may derive from the French 'chalne',
meaning warp. Related to harateen and moreen, often dyed red,
green, blue, purple or yellow, and sometimes watered.
CHIMNEY BLIND/BOARD
Alternatively a canvas roller blind or a painted fabric covered
board to close up a chimney opening in the summer.
CHINTZ
A word derived from 'chitta' meaning 'spotted cloth'. Often
a glazed cotton printed with vegetable colours with wood and
other blocks, produced originally in India.
CLOAK PIN
A brass, threaded pin, often gilt, round which the draw lines
of window curtains were formed.
CLOTH OF ESTATE
A roof piece, called a ceeler, with valances around it, and
a back piece called a tester. Some cloths of estate had a
matching chair, footstool or cushions. Others made of silk
with armorial embroidery, the cloth of estate projected from
the wall above the sovereign.
CLOTH OF GOLD/SILVER
A tissue of gold or silver threads interwoven with silk or
wool. Used for fine bed hangings and clothes denoting status
and luxury. Silver gilt and silver thread were imported into
England from Venice and are referred to in accounts as 'Venice
Gold' and 'Venice Silver'.
CLOTH, STAINED
Hanging of linen, hemp or wool, decorated with biblical or
mythological figure subjects by means of water-colours, distemper
etc.
CORDWAIN
Leather prepared from goatskin, named after Cordoba in Spain.
A cordwainer worked in Cordovan leather, usually being a member
of the Cordwainers Company.
COTTON
The white fibrous substance which covers the seeds of the
cotton plant, used for making cloth and thread. Confusingly
the term was used from the 16th Century onwards for a woollen
fabric manufactured in Lancashire and Wales.
COUCHING
Stitching a thick thread to the surface of material by means
of a fine thread.
COUNTERPOINT
A decorative bed covering frequently incorporating motifs
featured on other parts of the bed. 'Diamond or Brussels coverlets,
together with quilts, blankets may be purchased at Mr Carpenter's,
Ironmonger Lane, Cheapside, who was kind enough to furnish
me with this account of counterpanes' Sheraton.
CRANKET
A mattress with a checked linen ticking, filled with horsehair.
CRETONNE
Originally woven with a hempen warp and a linen weft, this
strong plain weave cotton cloth was produced in many colours
and printed by various processes.
CREWEL
A two ply worsted yarn suitable for embroidery and knitting
used particularly in the creation of curtains in the 17th
and 18th Centuries.
CUP
A finial on the top of a bed post, cup-shaped, often covered
with fabric, and from which feathers might be displayed.
CUPBOARD CLOTH
When dressing a cupboard with plates or 'objets' it was customary
to place them on a cupboard cloth, also known as a frieze
cloth.
CURTAIN
Suspended cloth, used as a screen round beds, at windows,
occasionally in front of paintings.
CURTAIN ROD
A wood or metal rod upon which curtain rings are threaded.
CUSHION
A fabric bag or case of varying shape filled with feathers
or another soft material.
DIAS
Raised platform, deriving from canopy.
DAMASK
A silk figured fabric with its name derived from Damascus,
from which its manufacture spread throughout Europe. Used
for bed-hangings and furniture covering, woven in England
at Norwich and Spitalfields. Damask should be made of dressed
silks, both in warp and woof. 'Damask is also a kind of wrought
linen made in Flanders, and in some parts of England, so called
because of its large flowers which resemble real damask. This
kind is chiefly used for table service, but the Syrian damask,
for all its kinds of dress' Sheraton
DAMASK LEATHER
A stamped glazed leather, often used as a table cover, as
a protective cover for library tables.
DIMITY
A stout cotton cloth, woven with raised stripes and fancy
figures, used undyed for beds and hangings.
DORCER
Mediaeval term for a hanging suspended upon the lower part
of a wall to protect the backs of those seated from the coldness
of the wall.
DORNIX
A cloth of linen warp and woollen weft, bought to Norwich
in the 16th Century by Flemish weavers. The range and pattern
varied considerably.
DOWLASS
A type of strong coarse calico.
DRAB
An undyed cloth of grey-beige colour.
DRAPERY
Sheraton stated 'the dressy part of beds and window curtains,
and is suspended to the tester of the former, and the lath
of the latter… in upholstery work there seems to be no
article in that branch more eagerly sought after. It has already
been turned into so many shapes that it has become quite a
difficult task to produce anything novel.'
DROP TESTER
The part of the press bed acting as a tester.
DRUGGET
A stuff, all of wool, or half-wool half-silk or linen, used
originally for wearing apparel, now implies a material protecting
carpets or table surfaces, made from wool and linen.
DUCAPE
A stout silk fabric which is often corded and watered.
DURANCE
A glazed worsted cloth of plain weave, finer than tammy,
used to back chairs.
EMBOSSING
A raised pattern on leather, cloth or metal which stood out
in relief.
EMBROIDERY
The application of decorative needlework to the surface of
a textile fabric, usually with needle and thread by hand,
but also by machine.
FERRET
A tape, ribbon or binding made of cotton or silk
FILLING
The material used for stuffing upholstered furniture, such
as hair or flock.
FLANNEL
A loose textured woollen stuff, used to line leather chair
covers. It was bleached in sulphur fumes to improve its whiteness.
FLEDGE
A material with herringbone effect in the weave.
FLOCK
Tufts and sprigs of wool or cotton waste used to stuff mattresses,
also used in powdered form, sprinkled on an adhesive ground
for flock wallpaper.
FLOOR CLOTH
A canvas floor covering, painted with formal or abstract
patterns to resemble tiles, marble etc.
FLORENTINE STITCH
Also called bargello, or Hungarian point, Irish stitch and
flame stitch. The upright stitches work wool in rows on canvas
resembling shaded zig-zag patterns.
FOOTBOARD
The padded or upholstered end of a bedstead, rising above
the level of the mattress.
FRENCH MATTRESS
Made from a mixture of wool and hair, in equal amounts.
FRINGE
An ornamental bordering of threads and silk, cotton etc.,
either loose or formed into tassels or twists. The pendants
from the head of a fringe are called hangers. Knotted fringes
were made as a pastime by ladies, but the quantities needed
by upholsterers saw to their commercial availability.
FULLING
Scouring and pressing of woollen goods to rid them of grease
and from into a felted mass.
FUSTIAN
A coarse twilled cotton cloth used for bed hangings and clothing,
made principally at Norwich, but also imported from Milan
and Naples.
GALLOON
A tape or ribbon, frequently woven of thick gold or silver
thread, and used to form patterns on bed valances etc..
GINGHAM
A cloth of pure cotton woven with dyed yarns in stripes and
checks, often used for making slip-covers.
GIRTH WEB
Strips of woven flax or hemp used to support the stuffing
of upholstered chairs.
GOBELINS
A family of French dyers, who in the 16th Century added tapestry
weaving to their activities.
GROSGRAIN
A plain weave textile wherein the weft yarns are heavier
than the warps to give a corded effect.
GROS-POINT
A form of cross stitch embroidery carried out on wool on
squared canvas.
HARATEEN
A worsted furnishing fabric made at Norwich, used for furnishing
and upholstery prior to 1750. It could be patterned between
hot copper rollers and was usually dyed yellow, green, red,
crimson or blue. Closely related to moreen.
HESSIAN
A coarse hempen cloth, used for packing and upholstery linings.
HOLLAND
A linen fabric, used for bed linen and linings, first made
in Holland.
HOOKS AND EYES
Small varnished metal fastenings to join fabric panels together.
Often use don slip covers etc.
HORSE HAIR
A form of covering for furniture woven from the manes and
tails of horses, with a linen or cotton warp. Could be made
in plain, chequered or coloured varieties. Used in making
haircloth for covering dining and library chairs.
INGRAIN CARPET
A non-pile reversible carpet made in Kidderminster, and Cumbria
and Scotland. The carpet was woven in narrow strips, ranging
from 18 to 36 inches wide from a wool that was dyed with fast
colours.
KERSEY
A cheap, coarse woollen cloth of twill weave. It was good
at resisting water and was in demand for clothing.
KIDDERMINSTER STUFFS
Diamond and chevron patterned worsted cloths made in Worcestershire.
LAMBREQUIN
French, a valance or pelmet.
LAMPAS
Indian painted and resist-dyed fabrics, usually made of silk
with metallic threads.
LAWN
A type of fine linen resembling cambric.
LINE
A twisted cord, usually of silk, used over pulleys to draw
up or part curtains, threaded through rings sewn into the
back of the fabric and then tensioned by fastening to a cloak
pin.
LINEN
A cloth of many grades and weaves from flax fibres.
LINSEY-WOOLSEY
A coarse cloth of linen warp and woollen weft, first made
at Linsey in Suffolk. Cheap, and often used in servant's quarters
for bed hangings.
LIVERY
Used on ceremonial occasions, by staff of royalty and nobility.
LUSTRING
A light crisp plain silk having a high lustre.
LYON
The most important silk-weaving centre in France in the 18th
Century.
MADDER
A red vegetable dye used for dyeing wool, silk and cotton,
made from a plant found in Asia Minor.
MANCHESTER VELVET
A common velvet made in all colours in Manchester in the
18th Century.
MANTUA
A silk of plain weave, heavier than taffeta
MATTED SEAT
Formed from rushes.
MATTRESS
A case of canvas or other coarse material stuffed with hair,
flock, straw or the like. Used as a bed or a support for one.
MERCER
Dealer in fabrics, ranging from costly silks and velvets
to those of simple style.
MOCKADO
A wool velvet derived from moquette, imported from Anatolia,
warp of linen, and pile of extra weft of wool.
MOHAIR
Cloth made from the hair of the Angora goat.
MOIRE
Cloth with a lustrous finish to give a watered figure.
MOREEN
A woollen material, sometimes mixed with cotton, used as
an upholstery material in the 17th and 18th Centuries.
MOROCCO LEATHER
Originally applied to red goatskin leather produced in North
Africa, later made in Levant and Turkey. Crushed morocco had
the grain flattened by planning to produce a mosaic of highly
polished high parts and dull veinings.
MURREY
A dull purple red colour often used to describe velvet.
MUSLIN
A fine cotton textile imported originally from Africa.
NAILS
Used in various forms and sizes to fasten upholstered coverings
to a wooden frame. Could be bullion nails, described by pattern
and weight.
NEEDLEWORK
A general term for patterns worked by hand with silk and
a needle.
NORWICH STUFFS
Worsted goods made in East Anglia and marketed in Norwich.
OLIVE
An oval covered button, shaped as an olive used for fastening
upholstery.
OS
Curtain rings of various sizes, usually of brass, sometime
gilded.
OSTRICH FEATHER
Used particularly for the plumes on state beds, and as a
motif in Elizabethan embroidery.
PALL
Cloth, usually black, purple or white velvet, spread over
a coffin, hearse or tomb.
PALLIASE
A small mattress, usually stuffed with straw.
PANEL
Strips of fabric applied over other fabrics, usually comprising
of contrasting colours, e.g. yellow on black.
PARAGON
A coarse worsted cloth, sometimes watered, often used for
window curtains.
PASSEMENTIERE
Narrow braids, formed by twisting threads, and including
as a class laces, fringes, galloon, gimp, etc.
PELMET
A three sided textile 'case' fixed at the head of a window
to hide rods, rings and the tops of curtains. Often mounted
on buckram and trimmed with fringes.
PELMET BOARD
A long rectangular board with various box-wood pulleys inserted.
Draw lines would pass over these to raise or lower curtains,
and be tensioned with cloak pins when the curtain was raised.
PENNYSTONE
A coarse woollen cloth made firstly at Penistone in the West
Riding of Yorkshire.
PERFUME BAG
Ambergris, musk, civet and other powders were used in bags
among clothes and fabrics, or as a perfume to impart an attractive
odour to fustian, leather etc. Also known as 'sweetbag'.
PERPETUANA
A woollen fabric, made by combing and carding wool mixed
in a twill weave. Its popularity was threatened in the 17th
Century by the use of imported calicos.
PERSIAN
A thin plain silk imported in the late 17th Century by the
East India Company.
PETIT-POINT
A form of embroidery worked, usually, in tent stitch on a
fine squared canvas.
PILLOW
A support for the head in reclining or sleeping. A case made
of linen was stuffed with feathers or other soft material.
PILLOWBEARE
A pillow case, usually of white cotton or linen.
PINTADO
Originally block-printed cotton cloth, but akin to chintz.
Imported into England in great quantities from the mid 17th
Century as quilts, curtains and cupboard cloths.
PLAID
A plain woven twill with a pattern of intersecting strips
in both warp and weft. 'Scotch Plaid' in mentioned in inventories
and used for blankets, hangings, ribbons etc.
PLEAT
Forming a shape in material by stitching and folding. Common
forms are 'box pleat' and the 'organ pleat.
PLUMBETS
Small lead weights incorporated into the linings of curtains
to assist their correct hang.
PLUSH
A wool velvet made in several colours, and used in furnishings,
altar frontals etc.
POMELL
A finial of ovoid form on the uprights of upholstered furniture.
Usually of gilt wood or copper, or covered with velvet or
damask.
PORTIERE
A door curtain, used to ward off draughts and made 'en suite'
to other curtains in a room.
PORTUGAL MAT
A distinctive form of rush matting often used in the 17th
Century in bed chambers.
QUILT
A bed coverlet with soft material (wool, feathers) between
two pieces of cloth. Quilting was a method of keeping this
wadding in place by stitching through the layers to form a
pattern in a diamond, chequered or other geometric shape.
RATTINET
A thin woollen stuff, similar to shalloon used for lining
curtains.
RAYNES
A linen of fine quality used in the 17th Century for sheets.
Took its name from Rennes, where it was originally made.
RIPPING
Tearing apart or unseaming of upholstery, done frequently
to form curtains into a new fashion by using the available
fabric.
RUGG
A coarse woollen coverlet for beds. 'Irish ruggs' are mentioned
in inventories.
RUSSETT
A coarse woollen cloth, also a brown colour.
RUSSIAN LEATHER
A distinctive leather or hide, originating in Russia. Very
resistant to water, has a diced grain produced with a plaque
of copper or wood whilst the leather is damp.
SAD
Denoting a dull or neutral colour.
SARCENET
A thin transparent silk, having originally been woven by
the Saracens.
SATIN
A smooth shiny silk made with the warp threads much finer
and more numerous to the square inch as to conceal the weft.
Many brocaded satins are really two-coloured damasks.
SAY
A thin woollen stuff of twill weave, used for linings.
SCRIM
A thin canvas used for lining and covering the wooden frame
of a chair.
SELVEDGE
The edge of a piece of material woven so the weft threads
do not unravel.
SERGE
A twilled cloth having a worsted warp and a woollen weft.
It was cheap and hard-wearing, used for curtains and valances.
SHAGG
A cloth having a velvet nap on one side, usually of worsted
but sometimes of silk.
SHAGREEN
Untanned leather, often dyed green and used to cover small
items. It is the skin of rays and dogfish.
SHALLOON
A twilled worsted cloth, often glazed or hot-pressed, used
for curtains and linings.
SILK
Cloth woven from filaments reeled from the cocoons of silk
worms.
SILKWOMAN
A specialist in spinning and dyeing silk.
SLIP-COVER
A covering for furniture, particularly tables and chairs,
made of leather, gingham or serge to protect for light and
dust.
SLEEVE
A fabric covering to protect bed-posts and enhance their
appearance.
SPARVER
A bed curtain.
SPIKES
Used in particular at the top of bed-posts in order that
the tester could be located thereon.
SPITALFIELDS
The centre of the London silk weaving industry. Many Huguenot
weavers settled there in the earl 18th Century.
SPRING UPHOLSTERY
Coiled metal springs to support upholstery came into use
from 1828.
SQUAB
A removable stuffed cushion.
STAY
A metal rod attached to a wooden frame and working over a
toothed ratchet to tallow the back of a settee to be adjusted.
STUFF
A general term for worsted cloths, but used to describe textiles
of all kinds.
STUFF-OVER
Used when the wooden frame of a chair or settee is completely
covered with upholstery.
STUMPWORK
A from of embroidery, padded as to be in relief, used as
a covering for boxes, looking glass frames etc.
SWAG DRAPERY
A draping of fabric across the top of a window in place of
a valance or pelmet.
SWISSED
A term used in relation to calico implying the process of
pressed to increase flexibility.
TABBY
A plain silk, often with a watered or waved finish.
TAFFETA
A plain woven silk with the weft threads thicker than the
warp ones. Made in all colours, checked flowered or with patterns.
Used for bed canopies, window curtains etc.
TAMMY
A lightweight worsted fabric, of an 'open' weave, often glazed.
Coloured tammy was mush used for bed and curtains.
TAPESTRY
A thick hand-woven fabric, usually of wool with pictorial
or geometric designs formed by the weft threads.
TASSEL
Cut cords or threads gathered into a tight bunch at the top
by a decorative braid, or passed through a pierced wooden
ball, covered with the same fabric.
TICKING
A linen twill. The best came from Flanders used for the making
of bags to enclose feathers.
TISSUE
A rich fabric having tow sets of warp threads, much used
with silver and gold threads, as bed hangings and coronation
robes.
TRAVERSE CURTAIN
Used to divide parts of a room or to screen alcoves etc.
TUFTED
The stitched and buttoning techniques used by upholsterers
to stabilize the fillings of chairs, sofas etc.
TURKEY WORK
A woollen pile fabric made to imitate Turkish carpets and
used for upholstery seats, and as floor and table carpets.
Worked on a loom, mounted with hemp warp threads, to which
the coloured yarns were tied by hand.
TWILL
Textile fabrics in which weft threads pass alternately over
one warp thread, and under two or more to produce diagonal
lines.
UTRECHT VELVET
A stout velvet made with a linen warp and weft, with pile
of goats hair. Made in solid colours or striped.
UMBRELLO
A sun shade fixed above a window, used in the neo-classical
period 1760-90.
VALANCE
A drapery hanging at the tester or base of a bed, often stiffened
with buckram.
VELVET
A pile fabric of silk, wool or cotton fibres. The best was
imported from Genoa. The pile is produced by adding to the
usual warp and weft threads an additional row of warp yarns.
These are woven into the surface of the cloth and passed over
wires on the surface. For a loop pile these wires are drawn
out. For velvet or other cut pile a knife is passed along
a groove at the top of each wire to cut the pile before the
wire is withdrawn.
WARP
Threads which are stretched lengthwise or vertically, in
a loom, to be crossed, horizontally by the weft.
WATERING
A waved or watered effect on fabric, achieved by means of
a press having heated metal rollers.
WEBBING
Narrow bands of hemp or jute. These are interlaced and secured
by tacks to the underside of a chair frame, forming a strong
base for the springs or stuffing.
WEFT
Threads which are stretched from side to side, or horizontally,
on a loom, to be crossed vertically by the warp.
WILTON
Small town in Wiltshire known for carpet weaving, with a
short thick pile.
WINDOW CLOTH
An absorbent cloth fitted into window embrasures in the winter
to absorb moisture and protect from draughts through ill-fitting
frames.
WORSTED
A woollen fabric or stuff made from well-twisted yarn spun
from long staple wool combed so that its fibres lie parallel.
A GUIDE TO UPHOLSTE
|